
What's not to love about San Francisco? In one small city, you get wall-to-wall shopping, eating, and sightseeing. And seriously, if you like food, San Francisco is the place to go. Just thinking about it reminds me of hot, creamy lattes, mouth-watering seafood dinners, to-die-for cupcakes, and ice cream like you've never had before. But if there's one thing San Francisco is known for, its sourdough. And if you're like me and in love with fresh, tangy, hole-y San Francisco Sourdough Bread, still warm from the oven, you would love to be able to produce that in your own kitchen. 
Until a few months ago, I had pretty much given up hope that it was possible. I was still trying, but I couldn't get that really sour flavor, no matter what I did. Then, on a last-ditch effort, I tried out a recipe I had seen on King Arthur back when I was spending hours delving into information on all things sourdough. I was hesitant to try it because it requires fed sourdough starter (which means you need to get rid of some of your starter before feeding it again to use for the bread) and takes about 24 hours to make from start to finish. I tried it anyway, though, and once the dough had risen, before I even put it in the oven, I had a feeling that this recipe was going to be the one. It had that sourdough smell, no mistaking it. Once the bread was baked and I cut a slice through the loaf, I was thrilled to see the crisp crust give way to an airy, hole-y crumb. And then, with the first bite, I honestly felt like jumping for joy, because finally - FINALLY - I had made my own San Francisco Sourdough Bread. 
I decided that this would be the best recipe to share for Part 3 of Conquering Yeast - a 3-post series on learning to love baking with yeast - because it's on the hard end of yeast breads. Firstly, you have to have a sourdough starter prepared. If you don't already have one, you can buy one (from King Arthur, for example) or make your own. It's also tricky because the dough for this bread doesn't contain any added yeast (just the yeast in the starter) which means the rising process isn't a speedy, beautiful one. That being said, none of the steps required to make this bread are really hard, it's just that the whole thing requires a bit of time and patience. It's so worth it though, because you'll never need to buy sourdough or dream about how good it is ever again. Or at least, if you do dream about it, you can satisfy those cravings on your own :).
San Francisco Sourdough Bread
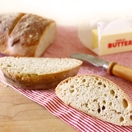
This San Francisco Sourdough Bread is sourdough perfection, with a crisp crust and an airy, hole-y, truly sour crumb.
- Cook Time: 25 minutes
- Total Time: 25 minutes
- Yield: 2 loaves
- : Alexandra Azary
Ingredients
- 1 cup fed sourdough starter*
- 1 ½ cups lukewarm water
- 5 cups all-purpose flour, divided
- 1 tablespoon granulated sugar
- 2 ¼ teaspoons salt
Instructions
- In a large bowl (I use my stand mixer), combine the starter, 1 ½ cups water, and 3 cups flour. Beat rapidly for one minute (I use the paddle attachment with the mixer on high speed).
- Scrape down the sides of the bowl and cover with a lightly oiled piece of plastic wrap. Let rise for 4 hours at room temperature, and then place in the refrigerator overnight (12 hours).
- Remove the bowl from the fridge and add the remaining 2 cups flour, sugar, and salt. Knead (I use my dough hook on medium-low speed) until you have a smooth ball of dough, at least 10 minutes. Add a bit more water if the dough doesn't seem to be coming together smoothly, but be patient, giving the dough time as it is kneaded to allow all of the ingredients to come together. If using a dough hook, you may need to help the machine along by flipping the dough to get all of the ingredients incorporated and/or keeping it centered on the dough hook.
- Shape the dough into a smooth ball and transfer it to a lightly oiled bowl, cover the bowl with oiled plastic wrap once again, and let rise until the dough has relaxed and seems soft and supple. It may rise a lot or not much at all. King Arthur says that this can take anywhere from 2 to 5 hours. Since my dough doesn't tend to rise much, I always let is sit the full 5 hours.
- Lightly grease a baking sheet or line it with parchment paper. Gently split the dough in half and shape each half into an oval, placing the loaves spaced out on the baking sheet to rise once again. Recover with oiled plastic wrap during this second rising. According to King Arthur, a good time frame for this rising is 2 to 4 hours. The loaves are supposed to get puffy, but may spread out noticeably more than they rise. Again, I always give this step the full amount of time (4 hours) because of the way my dough reacts. Sometimes I'll let my oven warm up for about a minute, turn it off, and let my dough rise in there for the last ½ hour or so, if I'm getting impatient and my dough doesn't seem to be rising enough at room temperature. If you do this, be sure to take the loaves out of the oven before preheating it for baking.
- Once the loaves are ready to bake, preheat the oven to 425 F. Right before you put the loaves in the oven, make 2-3 deep slashes in the tops with a serrated bread knife, using a back-and-forth motion. Spray the loaves with lukewarm water and place in the oven to bake for 25-30 minutes, until they turn golden-brown and sound hollow when tapped at the base. Let cool for at least 30 minutes before slicing.
- Store in an airtight bag in the fridge and reheat slices in the toaster, microwave, or oven, depending on your preference.
Notes
This recipe calls for fed sourdough starter, which means you need to remove a cup of starter, use it in another recipe, feed your starter, let it sit for at least 5 hours, and then use a cup of the fed starter for the bread. Sound confusing? See this post for more information.
This bread takes a while to make. I've found that it works well to feed my starter the morning before I'm ready to start the bread, start the dough for the bread in the early evening, let it rise overnight, and then finish and bake it the next night. With the longest possible time table, it won't be ready until late the second night, so think ahead if you plan on making it for a special dinner.
P.S. I hope I haven't scared you from trying to make this. It's seems intimidating, but it's sooo worth it in the end!
For more on Conquering Yeast, check out this English Muffin Toasting Bread and these Chocolate and Cinnamon Swirl Breads.
Recipe Adapted From: King Arthur Flour


Jancie
Love this bread making for the second time tonight:-) and pancakes are one of my favorite things to use the cup for, though my starter gets used so much it's always pretty fresh!:)
alexandra
Awesome! I'm so glad you're enjoying it; it's been too long since I made it myself. Love the pancake idea!
Angie T
I don't have plastic wrap and we are snowed in. I'd Can I use something else to cover this? Thank you in advance!
alexandra
I'd go for a kitchen linen/towel. :)
Ashley
Made this tonight and it was AMAZING! Thanks so much!
alexandra
So happy to hear that! It's one of my favorite breads for sure.
Melissa
The recipe states to remove a cup of the starter, use in another recipe, and use the fed starter for this bread recipe. What recipe(s) would you suggest using the cup removed from the starter? I have my starter all ready to go, just fed and now have that initial cup that was removed to use. Except I don't know where to use it! :)
alexandra
Well, I've made this bread with the unfed starter, which is a good everyday bread, but not as sour as the SF Sourdough recipe here. King Arthur also has a number of recipes that you could try, many of which use unfed starter. And you can always do a quick google search for recipes using unfed sourdough starter. :)
Zoey
This recipe sounds DE-LI-CIOUS! I just made the sourdough starter and it turned out great! I made the 'sponge' (Instructions 1 & 2); however, I just took a cup from the fresh batch of sourdough starter. I didn't use fed sourdough starter*, will the bread still turn out ok?
alexandra
Depending on how fresh your starter was (how recently you made it), it might not matter at all that you didn't feed it first. But either way, the bread should work out just fine, although you might need to extend the rising times since fed starter is more active. Once you start keeping your starter in the fridge, I would definitely recommend feeding it before using to get the activity going again. Hope that helps! Let me know if you have any other questions. :)
Lindsay
thank you for such a great recipe - I started this two days ago and had the first loaf this morning and it was great.
alexandra
I'm so glad you liked it! Good for you for going through the whole sourdough-making process; it takes a little bit of time but it's so worth it!
Diane Weber
I have never made sour-dough bread, but love it. I will give this a try. Thanks!!
brighteyedbaker
I hope you do! This is the first recipe that really worked for me. I haven't looked for another sourdough recipe since.