
I don't bake layer cakes all that often because (let's be real) I don't need an entire cake sitting in my fridge for me to eat by myself, but every once in awhile I'll pick a special occasion and use it as an excuse to make one. Part of that is honestly because I feel like I need to prove to myself that I haven't forgotten how to do it, but the other part is that after all these years, I still think decorating cakes is one of the things I enjoy most about baking. Especially since I've improved over time, it's less of an hours-long struggle and more of a creative outlet. Cakes are like mini works of art and I like that.

As far as I can recall it had been more than a year since I'd last made a cake until this cake came around, and I'm happy to report that cake-decorating seems to be one of those things you never quite forget how to do. It's like riding a bike in that it always comes back to you no matter how long it's been. And truthfully, this one was so much fun to decorate it was almost therapeutic. Mini cakes are great for sharpening up your cake-decorating skills; they're much faster to whip up and there's less room for error. I really love the way this one turned out - the ombré look is always one of my favorites and keeping the garnish simple with some fresh blackberries and mint gives it a nice, clean look that seems perfect for spring.
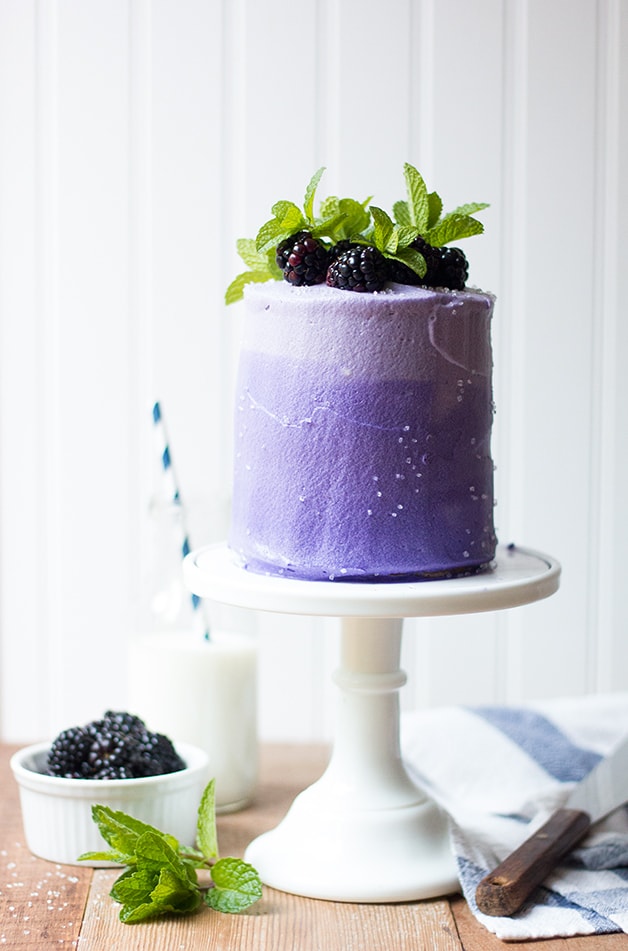
The cake itself is nothing super-fancy, but a good, tender-crumbed marble butter cake that adds just enough chocolate flavor to keep things interesting without being over-the-top. In an effort to keep it light and colorful (and because I love the idea of adding berries to spring/summer desserts), I went with my go-to cream cheese frosting and added a bit of blackberry juice to it for a hint of extra flavor. Together, they make a flavorful and yet somewhat no-frills kind of cake that would be great for Mother's Day or any springtime occasion. The recipe also makes a few cupcakes to serve alongside, which is always nice for taste-testing or as extras to-go (plus I think they're pretty cute too!).
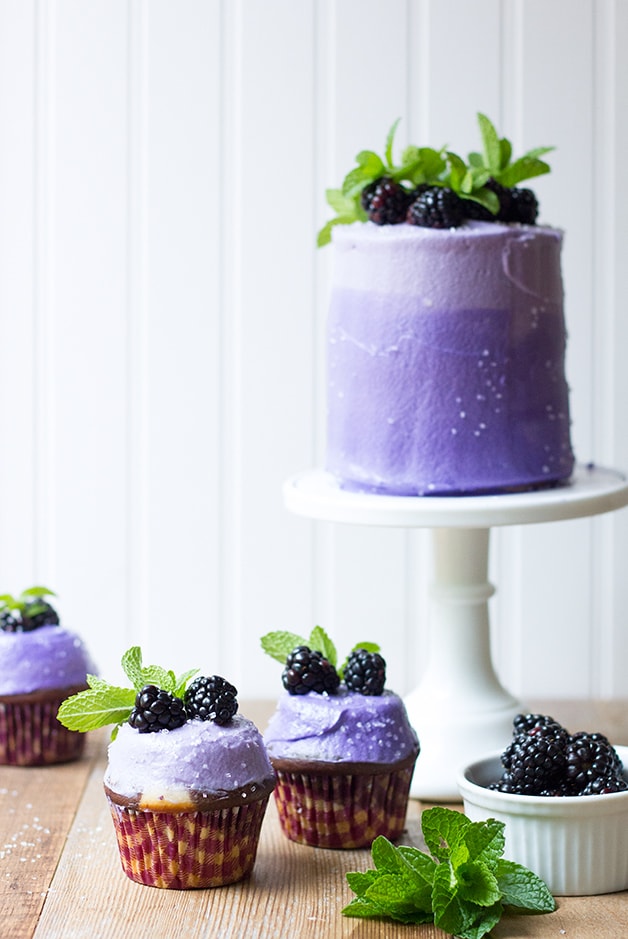
Mini Marble Layer Cake (and Cupcakes!) with Blackberry Cream Cheese Frosting
Can't decide between chocolate and vanilla? This marbled butter cake with a soft, tender crumb gives you the best of both worlds! It's finished with a light, slightly tangy blackberry cream cheese frosting and garnished with fresh mint and juicy berries to make a perfect spring or summertime dessert.
- Cook Time: 40 minutes
- Total Time: 40 minutes
- Yield: one 4" layer cake and 3 cupcakes*
Ingredients
Marble Cake
- butter, for cake pans
- 8 ½ ounces (2 cups, spoon and level) all-purpose flour, plus extra for dusting pans
- 1 vanilla bean, split and scraped
- 1 teaspoon baking powder
- ½ teaspoon baking soda
- ¼ teaspoon salt
- 4 egg whites, room temperature
- 7 ounces (1 cup) granulated sugar
- 1 teaspoon vanilla extract
- 4 ounces (½ cup or 1 stick) salted butter, melted and cooled
- 8 ½ ounces (1 cup) buttermilk
Chocolate Marble
- 2 ⅛ ounces (¼ cup) buttermilk
- 1 ⅛ ounces (⅓ cup) cocoa powder
Blackberry Cream Cheese Frosting
- 8 ounces (1 cup or 2 sticks) butter, room temperature**
- 8 ounces cream cheese, room temperature
- 3 ounces blackberries, muddled and strained***
- 1 teaspoon vanilla extract
- 16 ounces (4 cups) confectioner's sugar
- pinch salt
- gel icing color (I used Wilton's Royal Blue and Pink Icing Colors, but you could also just use a single purple shade)
Decoration
- extra blackberries
- fresh mint
- sparkling sugar
Instructions
Marble Cake
- Preheat oven to 350ºF and prep your pans. Butter two 4"x2" round cake pans and line bottoms with parchment rounds. Dust sides with flour and tap out excess. Line 3 cups in a muffin tin with cupcake liners.
- In a large bowl, whisk together the flour, vanilla bean seeds, baking powder, baking soda, and salt.
- In the bowl of a stand mixer fitted with the wire whip attachment (or using a second large bowl and handheld electric mixer) begin beating the egg whites on medium-high speed. After a few seconds, slowly pour in the sugar while continuing to beat. Beat for 3-4 minutes, or until white and fluffy.
- Reduce mixer speed to medium. Slowly and carefully pour melted butter into egg mixture while beating. Add vanilla extract and continue to beat just until all ingredients are incorporated, wiping down bowl and beater as needed.
- With mixer on low speed, add ⅓ of the flour mixture followed by ½ of the buttermilk. Continue to alternate adding dry and wet ingredients in this manner until all have been added, beginning and ending with dry ingredients. Mix just until evenly incorporated, again wiping down bowl and beater as needed.
- Remove half the batter from the mixer. Add the buttermilk and cocoa powder for the chocolate marble and mix in on lowest speed until mostly incorporated. Finish folding in by hand.
- Alternate adding white and chocolate batter to cake pans, filling each about ¾ full. Repeat with remaining batter to fill cupcake liners. Swirl batter briefly with a knife or icing spatula to achieve marble effect.
- Bake cakes/cupcakes in preheated oven until a toothpick inserted into the center of each comes out clean or with just a few moist crumbs, about 20 minutes for cupcakes and about 40 minutes for cakes. Allow cupcakes to cool in pan for a few minutes before moving to a wire rack. Let cakes cool completely in pans on a wire rack before removing.
- Once cool, wrap cakes tightly in plastic wrap. Freeze for 30 minutes prior to frosting. Cupcakes can be kept in an airtight container at room temperature until ready to frost.
Blackberry Cream Cheese Frosting
- In the bowl of a stand mixer fitted with the wire whip attachment (or using a bowl and handheld electric mixer) cream together the butter and cream cheese on medium-high speed until smooth. Add blackberry juice and vanilla extract and beat in until incorporated.
- With mixer on low speed, gradually add confectioner's sugar, wiping down bowl and beater as needed. Once all has been added, increase speed to medium-high and beat until smooth, creamy, and fluffy. Beat in salt.
- Add icing color to frosting and mix in by hand to achieve a light lavender color.
Assembly and Decorating Cakes:
- Remove cakes from freezer and use a large serrated knife to slice the domed tops off of each one. Slice each cake in half to form four layers.
- Place one layer on a cardboard cake round set on top of a rotating cake stand. Use an offset spatula or palette knife to spread a layer of frosting over the top. Repeat with next two layers. Add top layer and cover entire cake with a thin layer of frosting to seal in crumbs. Place in the refrigerator to chill briefly while prepping remaining frosting.
- Divide the remaining frosting into three separate bowls. Leaving one portion as-is, use icing color to color the two remaining portions increasingly darker shades of lavender/purple.
- Remove cake from refrigerator and add a very large dollop of lightest frosting color to top of cake. Use offset spatula/palette knife to spread into a flat layer and push excess frosting over edges, working until top of cake is fairly smooth and neat. Add darkest frosting color to bottom ⅓ of cake and spread to cover. Finally, add last frosting color to middle ⅓ of cake to cover. Use offset spatula/palette knife to smooth out sides of cake while removing excess frosting and gently blending different colors to achieve ombré effect. Be careful not to work the cake so much that you loose the various shades of color.
- Use offset spatula/palette knife to wipe off any excess frosting around top perimeter of cake. Once done, frosting should be smooth all around.
- Garnish top of cake with fresh blackberries and mint. Sprinkle with sparkling sugar as desired.
Assembling and Decorating Cupcakes:
- Using an offset icing spatula, scoop a large dollop of frosting**** on top of each cupcake and spread to cover surface of cupcake, keep frosting mounded in center. Holding spatula at an angle, smooth out frosting around sides of cupcake to form a cone base. Use icing spatula to smooth and level frosting in center.
- Garnish tops of cupcakes with fresh blackberries, mint, and sparkling sugar.
Storage
- Cake is best served fresh, but leftover cake and cupcakes can be kept in an airtight container in the refrigerator.
Notes
*Alternatively, if you have 3 mini cake pans, you could probably make two mini 3-layer cakes rather than one 4-layer one and skip the cupcakes.
**You can use salted or unsalted butter for the frosting; I've done it both ways depending on what I have on hand.
***You could probably use a slightly larger quantity of blackberries to get more of the flavor if desired, but do so carefully since you don't want the frosting to be runny. My blackberry mimosa recipe has detailed instructions on how to make juice from fresh blackberries.
****I alternated the frosting color for each cupcake.
Marble Cake adapted from Will Cook for Smiles, Frosting adapted from i heart baking
For more recipes and other food-related tidbits, stick around and subscribe to receive new blog updates by e-mail or RSS. You can also find recipes by category in the recipe index.


maggie
Such a fun recipe, cute cake and delicious! I didn’t separate the batter exactly in half which made it a lackluster marble but that one is on me! The icing is to die for
SANDRA
Stunningly beautiful; I must say. I know it was enjoyed!