
I definitely have a love-hate relationship with cakes. It's nothing new, but something I've fully come to terms with lately.
Things always start out in the love territory. I love the idea of cakes, I love how they look when they come out perfectly, and I loooove eating them (duh!).
The hate starts factoring in when I'm knee-deep in frosting, I can't quite make my cake look as perfect as that one photo/video/etc. made it seem, and my kitchen looks like a war zone of cake crumbs and icing spatulas. Very true and not cool.
Somehow, I always tend to forget about that second part when I set out to make cake again. Either that, or I just have this crazy notion that things will be different next time. I'll remember how cute that last cake turned out and convince myself that I'm much more experienced and therefore won't have any troubles. Hmm...
I realize that pretty much every time I post a cake recipe, I wind up talking about how hard the decorating part is. Part of it's probably just me venting, but part of it is also to say that if I can do it, so can you.
I'm here to help, and so is this neat little website called Craftsy. Last week I told you all about Craftsy, an online "classroom" for how-to and DIY-everything. Craftsy's free Modern Buttercream class was really helpful for me since I'm still trying to improve my cake-decorating. I'm going to walk you through the steps for decorating this cake, but if you really want to learn some solid cake-decorating skills, take the Modern Buttercream class on Craftsy's website; it's free for everyone!
Before we get to the how-to, let's talk about flavors...and taste...and CHOCOLATE CHAI. I'm not really much of a chai girl usually, but somehow I decided it would be a good idea to make chocolate chai cake. Guess what? It was! The cake itself is super moist and chocolate-y, but the warm chai spices still shine through. I decided to frost it with a simple chai whipped cream, which is light and airy with a sweet, creamy spiced flavor. Butttt, since I can't ever seem to actually keep things simple, I also added chai-infused chocolate ganache to the party - between every layer and all around the outside of the cake. I like to make cakes for chocolate lovers, and that's definitely what this is. All the warm notes of chai spices are also perfect-O for fall. :)

Okay, Cake Assembly How-To, here we go:

1. Start with two baked cakes that have been tightly wrapped in plastic wrap and frozen for about 1 hour. I used 4-inch cakes here. Take one cake and place it on a rotating cake stand. Use a knife to score around the outer edge just below the rounded top of the cake, turning the stand as you go to help you score.
2. Following the guide you just created, level off the top of the cake.
3. Just like you did in step 1, score along the middle of the cake, in preparation for cutting the cake in half. It helps to stick a toothpick in each side of the cake (90º angles) to help you keep your scoring line even. Score and then remove the toothpicks.
4. Slice the cake in half along the scored line.
REPEAT steps 1-4 with your second cake.
5. Place one cake layer on a cardboard cake round and set it on your rotating stand. Spread a thin layer of ganache on top, followed by a thin layer of chai whipped cream.
6. Continue spreading chocolate ganache and chai whipped cream on top of each cake layer, stacking the layers as you go. Chill the cake for about 30 minutes so the filled layers set.
7. Use an offset spatula to frost the outside of the cake with a thin layer of ganache, sealing in all the filling. Smooth this layer out with a bench scraper. This is basically your crumb coat, but done with ganache. If you want to, you can trim the extra cardboard around the cake at this point, so it won't show with the finished cake.
8. Frost over the crumb coat with a generous layer of chai whipped cream. Start with an offset spatula and then smooth out with that or a bench scraper.
After that, you're all set to decorate! I piped a ribbon around the top and bottom of the cake with the ganache, and added some sugar pearls. I always find that the finishing touches make a HUGE difference in the look of the cake, so don't be afraid to pull out your piping bag and some sprinkles!
PrintChocolate Chai Layer Cake
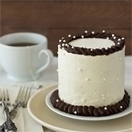
Warm chai spices make this Chocolate Chai Layer Cake perfect for the cooling autumn months. Moist, Chai-Spiced Chocolate Cake is filled and frosted with rich Chai-Infused Ganache and a light and airy Chai Whipped Cream.
- Cook Time: 40 minutes
- Total Time: 40 minutes
- Yield: one 4-inch, 4-teir cake
- : Alexandra Azary
Ingredients
Chocolate Chai Cake
- butter and cocoa, for cake pans
- 3 ounces (⅜ cup) boiling water
- 1 chai tea bag
- 2 ⅜ ounces (½ cup plus 1 tablespoon) all-purpose flour, spoon and level
- 1 ⅜ ounces (⅜ cup) dutch-process cocoa
- ⅜ teaspoon salt
- ¾ teaspoon baking powder
- ⅛ teaspoon baking soda
- pinch cinnamon
- pinch ground cardamom
- pinch ground cloves
- pinch ground ginger
- 2 ounces (¼ cup) canola or vegetable oil
- 5 ¼ ounces (¾ cup) vanilla sugar (or granulated sugar)
- ⅞ ounce lightly beaten egg (½ an extra large, lightly beaten egg)*
- 3 ⅛ ounces (⅜ cup) sour cream
- 1 teaspoon vanilla extract
Chai Whipped Cream
- 10 ⅜ ounces (1 ¼ cups) heavy cream, divided
- 1 chai tea bag
- ⅝ teaspoon powdered gelatin
- 1 vanilla bean, split and scraped
- 2 tablespoons confectioner's sugar
- pinch ground cardamom
- pinch ground cinnamon
- small pinch ground ginger
- small pinch ground cloves
Chai Infused Chocolate Ganache
- 8 ¼ ounces (1 cup) heavy cream, divided
- 1 chai tea bag
- 7 ½ ounces bittersweet chocolate, finely chopped
- 1 tablespoon confectioner's sugar, sifted
Instructions
Make the Chocolate Chai Cake:
- Preheat oven to 325ºF. Butter the bottom and sides of two 4" round, 2" deep cake pans and line bottoms with parchment circles. Dust sides with cocoa and tap out excess.
- Pour the boiling water over the tea bag in a glass and let steep while preparing the cake batter, for at least 5 minutes.
- Sift the flour and cocoa into a bowl. Add the salt, baking powder, baking soda, cinnamon, cardamom, cloves, and ginger and whisk together until evenly combined.
- In a separate bowl, combine the oil, granulated sugar, egg, and sour cream. Whisk together until smooth.
- Add half of the dry mixture to the wet ingredients and fold in until almost evenly incorporated, with a few streaks of the dry still visible. Squeeze out any liquid soaked up in the tea bag (to ensure you still have 3 oz liquid) and pour brewed tea into batter. Fold in until partially incorporated. Add the remaining dry ingredients and fold everything together just until evenly combined with no dry ingredients visible; lumps are fine.
- Divide the batter evenly between the two prepared cake pans. Bake in the preheated oven for 40-45 minutes, until a toothpick inserted into the center of each comes out clean or with barely a few small crumbs.
- Allow cake to cool in pans for 15 minutes, and then turn out onto a wire rack lined with two large squares of plastic wrap. Once cakes have cooled completely, use plastic wrap to wrap tightly until ready to frost. About 1 hour before assembling cake, place wrapped cakes in an airtight zip-top bag and chill in freezer.
Begin the Chai Whipped Cream:
- Microwave 2 ⅛ ounces (¼ cup) cream in a microwave-safe measuring glass for 15-20 seconds, or just until it begins to boil. Pour over the tea bag in a heat-safe cup and leave to brew, about 5 minutes. About halfway through this time, use a spoon to stir the cream and press the flavor out of the tea bag. Once brewed, transfer to the refrigerator to chill until cold.
- If possible, chill bowl of stand mixer, or other bowl for beating cream, during this time.
Make the Chai-Infused Chocolate Ganache:
- Brew another tea bag in 2 ⅛ ounces (¼ cup) cream just as you did for the chai whipped cream above. Set aside after brewing; do not refrigerate.
- Place the chopped chocolate in a microwave-safe bowl. In a separate, microwave safe measuring glass or bowl, microwave the remaining 6 ⅛ ounces cream (¾ cup) to bring just to a boil, about 45-60 seconds. Pour over the chopped chocolate and add the brewed chai, making sure all of the chocolate is submerged. Let sit for 5 minutes, and then stir until completely smooth. Stir in the sifted confectioner's sugar. Set aside to cool until spreadable, stirring occasionally to promote even cooling.
Finish the Chai Whipped Cream:
- Once the chai brewed for the whipped cream has cooled completely, remove from refrigerator and sprinkle the gelatin on top. Stir in and let sit for 5 minutes to bloom. Once bloomed, microwave for 5-10 seconds at a time, stirring in between increments, until all of the gelatin has dissolved. Be careful not to let the cream come to a boil during this time. You may need to press on any bits of clumped gelatin with a spoon as you stir until it fully dissolves. Once done, strain through a fine-mesh sieve into a clean container.
- In (chilled) bowl of stand mixer (or other bowl if using a handheld mixer) beat remaining 8 ¼ ounces (1 cup) heavy cream with vanilla bean seeds until thickened, stopping just before soft peaks form. With mixer speed on low, slowly add sifted confectioner's sugar. Keep on low as you add strained gelatin mixture in a very slow stream. Add spices. Increase speed and beat JUST until stiff peaks form; I usually stop just shy of this point and finish beating with a whisk to prevent overbeating.
Assembly:
- Place one cake on a rotating cake stand and slice the top off to create a flat surface. Then, slice cake layer in half to create two thinner, even layers. Repeat with second cake.
- Set first layer on a cardboard cake round on top of cake stand. Using an offset spatula, spread a thin layer of cooled ganache on top, followed by a thin layer of whipped cream. Spread a thin layer of ganache on top of remaining cake layers before stacking. Then, one at a time, stack remaining layers over first, adding a layer of whipped cream over each layer of ganache as you go, until you have a four-tier cake with ganache and whipped cream between each layer. Place in the refrigerator for 30-60 minutes to set (so layers won't slide around when frosting outside of cake).
- Once set, use an offset spatula to frost top and sides of cake with a thin layer of ganache, making sure to cover the whipped cream between the layers completely to seal it in. Use a bench scraper (or offset spatula) to smooth out the ganache; it doesn't have to be perfect, just somewhat smooth.
- If ganache on cake feels soft, refrigerate cake until it is firm. Otherwise, continue with cake assembly. If desired, carefully cut off excess cardboard around cake (for cleaner presentation). Then, frost over ganache with whipped cream. Frost top and sides generously, and then use a bench scraper or offset spatula to remove excess cream and smooth top and sides.
- Decorate cake as desired. I use some of the extra ganache to pipe a ribbon around the top and bottom perimeter of the cake** with a petal piping tip, and decorated with sugar pearls.
- For easy slicing, refrigerate cake for 1-2 hours to set whipped cream and ganache before slicing. Slice with a warm, dry knife. Store leftover cake in an airtight container in the refrigerator and bring to room temperature before serving.
Notes
*To measure half an egg, beat a whole egg and then divide it in half by weight (preferably) or by volume.
**If ganache becomes to firm to work with at any point, or is not soft enough to pipe for decorating cake, microwave for about 5 seconds at a time (no more), stirring in between increments, until softer and smooth again.
This is a sponsored conversation written by me on behalf of Craftsy. The opinions and text are all mine.
Get the heads up on everything new at Confessions of a Bright-Eyed Baker by subscribing to receive updates of new posts, with recipes, kitchen tips, and more via e-mail or RSS. You can also find recipes by category in the recipe box.
![]()
![]()
![]()
![]()
Bill
I can't believe you doubt your cake decorating skills. I would call this cake a work of art! So beautiful! Love your blog and your obvious talent with baking!
alexandra
Aww, thanks Bill! I guess you don't believe me because you don't see me in the kitchen acting like a maniac trying to make the cake look nice. I guess I'm just lucky it all works out in the end. :)
Amy
Yeah... Umm, I still don't believe you. I am the WORST cake decorator in the world! (Probably because I've been too intimidated since birth to even try...) I wish I could visit you so you could show me in person! And so I could sneak a piece or two of this cake. My mom loves chai and has a chai latte every day, so the second slice would be for her, of course! :)
Natasha
This cake is gorgeous! I love the double layer of frosting.
alexandra
Thank you! Sometimes you just need more frosting/filling. :)
ashley - baker by nature
This cake is gorgeous! And such great flavors, too. Happy I found your lovely blog.
alexandra
Aww, thank you so much! :) I'm glad you found it too!
Chung-Ah | Damn Delicious
What a stunning cake!
alexandra
Thank You! :)
Dina
what a lovely cake--sounds delish too!
Melanie @ Carmel Moments
That looks so fabulous! Love chai and chocolate so I'm sure this cake would be divine!
alexandra
Thanks! Like I said, I'm not even a big chai lover, so for those who REALLY like chai, I'm sure this would be right up their alley. :)
Laura (Tutti Dolci)
Beautiful cake, I love the chocolate and chai flavor combo!
alexandra
Thanks Laura!
Erika
I love your over-the-top cakes and I keep meaning to take advantage of those Craftsy classes. Trying to decorate my Halloween-themed cupcakes only reminds me how bad I am at decorating cakes! Urg. Yours looks absolutely gorgeous though, so I have no idea what you're even talking about!
alexandra
Haha thanks, but seriously, every pretty-looking cake I manage to post is a total miracle. Somehow they go from disaster to disaster-in-disguise, but I'm just happy I'm able to pull it off. :) Craftsy will help though, I think!