In the face of a nice, thick slab of warm homemade bread, I melt like butter. If you've ever taken a freshly baked loaf of bread, cut off a hearty slice, spread a little butter on it to ooze and melt, and sunk you're teeth down into that first, mouthwatering bite, you know what I mean. It's like heaven in bread form.

On the other hand, if your bread-eating experiences have been limited to the sad little plastic-wrapped loaves you pick up at the grocery store, you've been deprived in life, and I'm really sorry for you. Good bread is the kind you get at a local bakery, a great restaurant, or best of all, out of your own oven. It's the kind that greets you with its intoxicating aroma before you take a single bite, the kind where texture and flavor work together in perfection. And as much as you might know that I love all things chocolate, I don't know if I've really told you guys how much I love good ol' bread in all of its not-sweet glory. That changes today.
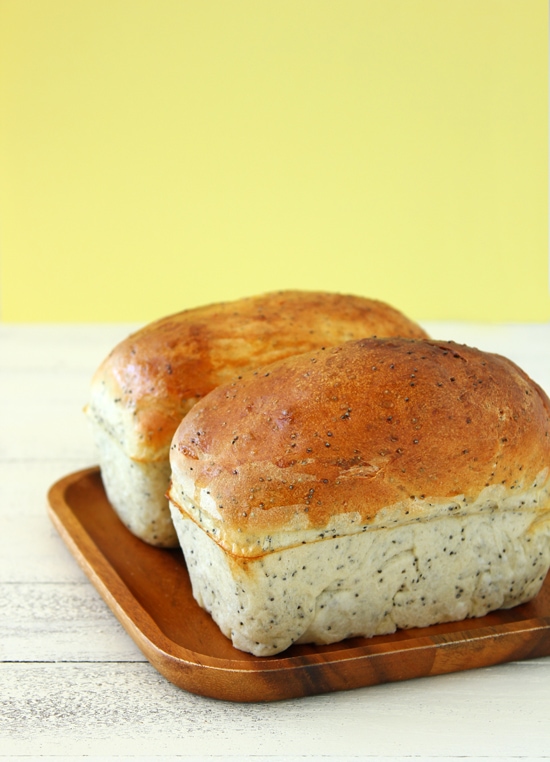
These Poppy Seed Loaves are one of my favorite. breads. ever. Sometimes I'm dramatic, but not today; this is serious. Along with sourdough and beer bread, it's one of the few savory bread recipes I've made multiple times and will continue to make, over and over, because it's just that good. It's simple and comforting and packed with flavor, and it lets poppy seeds shine in a way they don't often get to do. The crumb is incredibly soft and tender, the crust is perfectly golden, and the poppy seeds, with their slightly nutty flavor, make every bite incredible.

This bread would be perfect a million different ways - toasted and served with a fried egg, used in a sandwich, or enjoyed on its own, with some warm butter melting into its airy crumb. Heck, even without the butter, it's a winner. Point being - put this on your t0-bake list. And if you've never made homemade bread before, here's a chance to start. This recipe is simple, it's tried-and-true, and it makes some fantastic bread.
Poppy Seed Loaves

This savory Poppy Seed Bread has a light, tender crumb and a perfectly golden crust. Riddled with poppy seeds, it's the perfect bread for toasting, making sandwiches, or just enjoying on its own.
- Cook Time: 15 minutes
- Total Time: 15 minutes
- Yield: 4 (5-¼ x 2-½ inch) mini loaves and 1 mini round 1x
Ingredients
Dough*
- generous ½ cup warm water, plus a bit more if needed
- 1 tablespoon granulated sugar, divided
- 1 ½ teaspoons active dry yeast
- 1 ¼ cups milk
- 2 tablespoons butter
- 6 cups bread flour
- 2 teaspoons salt
- 5 tablespoons poppy seeds (¼ cup plus 1 tablespoon)**
Egg Wash
- ½ egg white
- 1 teaspoon water
Instructions
- In a large bowl, add 1 teaspoon granulated sugar to water and stir in to dissolve. Sprinkle the yeast on top and continue to stir until the yeast is mostly dissolved/incorporated. Let sit for 5-10 minutes, until foamy (signifying that the yeast has been activated).
- Meanwhile, combine the milk and butter in a microwave-safe bowl and microwave just long enough to warm the milk and melt the butter, about 30 seconds. Stir to combine, and allow to cool slightly while the yeast is foaming up. You want the mixture to be warm but not hot.
- Add the milk and butter mixture to the yeast mixture, stirring it in slowly. Add the flour on top, followed by the remaining 2 teaspoons granulated sugar, salt, and poppy seeds. Stir together until the mixture turns into a rough and shaggy dough. Then, use your hands to finish kneading all of the ingredients together. If needed, add a bit more water a tablespoon at a time to incorporate everything into a fairly moist dough (it should be neither dry nor sticky).
- Place the dough in a stand mixer fitted with the dough hook attachment and knead with the machine until you have a soft, fairly smooth, and more elastic dough.*** Shape into a ball with a smooth top and place in a bowl greased with cooking spray.**** Turn the dough over once to coat the top with spray as well. Cover with greased plastic wrap and allow to rise until doubled (1 ½ - 2 hours).
- Once risen, punch down the dough gently and divide it into the number of loaves you plan to make. I used 4 mini loaf pans, each measuring 5-¼" by 2-½", and I used the remaining dough to make a small, free-form round. If you have mini loaf pans that are a slightly different size, feel free to use them, or just make multiple round loaves.***** Lightly grease your loaf pans with cooking spray, and line a baking sheet with parchment paper.
- For mini loaf pans, shape each piece of dough into an oblong about the length of the pan you're using, gently pulling any uneven areas on the top surface of the dough underneath so that the top of the oblong is nice and smooth. Place it in the prepared pan, smooth side up, flattening the top gently with your palm to push the dough into the corners of the pan. The dough should reach about halfway up the height of the loaf pan. Place the mini loaves on the lined baking sheet.
- For free-form round loaves, shape each piece of dough into a ball, forming a smooth top by pulling the top surface of dough outwards and under with your thumbs, pinching the dough together underneath. Place pinch-side down on the lined baking sheet along with the mini loaf pans, or spaced apart from the other rounds (if you're making multiple).
- Cover all of the loaves with a large piece of plastic wrap sprayed with cooking spray, and allow to rise until the bread has risen about an inch above the top of the mini loaf pans at its highest point, or has approximately doubled in size for the mini rounds. Meanwhile, preheat oven to 400°F.
- Whisk together the egg white and water for the egg wash and brush over all of the exposed areas of the loaves just before baking. Bake in the preheated oven for 15-20 minutes, until the tops are golden brown and the loaves sound hollow when tapped at the base. Cool on a wire rack for at least 30 minutes before slicing, and store in an airtight ziploc-type bag.
Notes
*This bread can also be made in a bread machine. Follow your machine's instructions for the order in which to add the ingredients and use the normal setting with medium crust. Brush the egg wash on just before the beginning of the baking cycle.
** You can purchase poppy seeds online, in bulk, which seems to be a much better deal than you often find locally.
***You can also knead the dough by hand, but I recommend using a dough hook if possible with this dough; kneading by hand will take a little strength. If you choose to go the hand route, you'll need to knead the dough for a bit longer than you would with the dough hook, about 10-15 minutes.
****It's always helpful to use a bowl (for rising) that's about double the size of the unrisen dough, so you can easily gauge when the dough has risen enough.
*****You could probably also make two 8-½" x 4-½" loaves with this recipe, but you will need to increase the baking time.
Recipe Adapted From: The Complete Book of Bread and Bread Machines


Nada Nosseir says
I had looked around at different recipes, but from the photos yours looked the fluffiest. Definitely turned out fluffy, light, and great for a snack- maybe some cream cheese too? DEEEEELICIOUS! Thank you for sharing!
It was no fuss, not too many ingredients, and baked reeeeally fast! Whipped this up in no time! I've always used a bread maker to make bread, but I thought i'd try it out the old fashioned way this time, and it worked! Used 5 cups whole-wheat to 1 cup white flour. The loaf cracked at the top so i think i'll make some slits at the top next time.
Also great on the instructions. Very precise. Not too many words. Thanks again!
alexandra says
That's awesome! This is one of my favorite breads, so I'm so glad you liked it. I'm impressed that you were able to use 4 cups of whole wheat flour for the recipe; I should give that a try since I'm all for using more whole grains. And I'm glad you found the directions helpful! I try not to be too wordy, but I also want to make the instructions clear so anyone can be successful no matter their skill level. :)
Nada Nosseir says
I would suggest 3 white and 3 wholewheat.
The first loaf I tried (in a pan) cracked and was too crumbly overall. For the rest of the dough, I hand-shaped it into 2 round loaves. Was somehow less crumbly, but still. I'll do 3 and 3 next time.
Thanks again!
alexandra says
Good to know. Thank you!
Averie @ Averie Cooks says
This loaf looks so soft, fluffy, tall, and proud! I love it! The poppy seeds are also great but the dough base itself looks so good!
alexandra says
Thanks, Averie! I agree - the dough itself is something to marvel at. A good bread dough is a gem. ;)
Julia | JuliasAlbum.com says
This bread is such a beauty! It's been a while since I made my own bread, unfortunately.
Erika says
Haha yay! You definitely did a great job with this post! And I'm also curious about the surface under the bread--is that a table or did you like hand paint some wood yourself? Actually, I'm looking at another post of yours and the same white background is there, so I'm assuming it's a table or chair or something. Anyway, I love it! I've been thinking about trying to paint some backgrounds for my photos!
alexandra says
Oh that's actually a wooden board that I made. Here's the link to the tutorial I found online to help me do it. For this one I glued individual planks of wood together and then painted it. It was actually really simple and I use it all the time... obviously. :)
I also just finished painting another board, but on the second one, I bought a large piece of wood rather than individual planks. It doesn't have the slats in the finished product, but you still get the wood texture and distressed painted look. That one was even easier.
Erika says
That's awesome, thanks so much!!!
Erika says
Alexandra! The way you write about biting into fresh bread makes ME want to bite into some...RIGHT. NOW. Which I can't, because I'm detoxing. Ugh! But when I'm done, I will be making this. I can't believe it's so fluffy and light-looking and there's only 2 tbsp of butter! Win. What did you use for the background of these photos?? Love the styling!!
alexandra says
Thank you SO MUCH Erika. :) Sometimes I sit at the computer and I feel like I can't write anything... I write and erase and read and reread... so I'm so glad that you connected with this post. And yes - 2 tablespoons of butter! I know - it seriously is like a miracle.
The yellow background is actually just a colored piece of cardstock. Hah :) This trick doesn't always work too well for me because the paper I have is small, but it worked this time. The bright yellow was just calling my name with this bread for some reason. I guess it just makes me happy because it tastes so good!
Anna says
I love making homemade bread and I will definitely try this one :9
Thanks for sharing
alexandra says
Awesome to hear! I think you'll really love the bread. :)
Rachel @ Bakerita says
Gorgeous loaves, bread truly is heavenly! I definitely want to try out this recipe. Homemade bread is always the best. Can't wait to try it.
alexandra says
Thanks! I'd love to hear if you try out the bread.
Kare @ Kitchen Treaty says
These are lovely and look so delicious. And I LOVE that kitchen towel!
alexandra says
Aww, thank you! The kitchen towel is from Ikea. :) I use it all the time!
Laura (Tutti Dolci) says
I'm a bread girl too, lovely loaves!