
It's becoming ridiculous when I realize how many recipes I have in the lineup to share, considering the fact that many of them date from last summer, if not earlier. If that happens once, like with these gorgeously perfect strawberry muffins, then okay, I can deal with that. But when there are so many that I completely forget about them until the point that I scroll through all my photos and find sets from a year back, I start to realize it's an issue that needs fixing. Today is one fix of many that need to come, and honestly I'm not sure why I didn't share this one sooner because, admittedly, I definitely have a bread obsession (on top of my dark chocolate and caramel obsessions, that is).

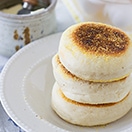
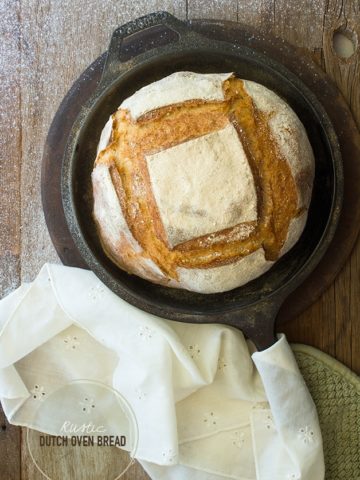
The sad truth is that I got rid of my sourdough starter a while back, because, quite honestly, I didn't have time to deal with it and I'd sorta messed it up. But back when I was a diligent sourdough-maker (because there was a time when I was on top of things like that) this was one of my favorite recipes to make, in addition to this amazing sourdough bread. The two are on opposite ends of the sourdough spectrum, but both are so incredibly good in their own way. These english muffins are soft and light and puffy and... just dreamy. They're not quite like your typical english muffin, and they're also not an especially sour sourdough, but they're something of their own that's 100% divine. They make an amazing breakfast that I *plan* on sharing next time, but until then, just know they work perfectly with melted butter, jelly, eggs, or just about anything you can think to top them with. And if you haven't gotten a sourdough starter going yet in your kitchen, get on it! For reals ;)
PrintSourdough English Muffins
- Cook Time: 16 minutes
- Total Time: 16 minutes
- Yield: about 20-22 english muffins
- : Alexandra Azary
Ingredients
- 8 ounces (1 cup) warm water (110º-115ºF)
- 2 tablespoons granulated sugar
- 3 ½ teaspoons active dry yeast
- 8 ½ ounces (1 cup) milk
- 17 ounces (4 cups, spoon and level) all-purpose flour, divided
- 9 ⅛ ounces (1 cup) sourdough starter
- 12 ¾ ounces (3 cups, spoon and level) bread flour, divided
- 2 ounces (¼ cup) butter, softened and cubed
- 1 tablespoon salt
- cornmeal, for rolling and dusting
Instructions
- Sprinkle sugar over warm water in the bowl of a stand mixer. Stir in with a wooden spoon to dissolve. Sprinkle the yeast on top, stir in, and let sit for about 10 minutes, until foamy.
- Meanwhile, scald the milk in the microwave (or on the stove) by heating until the temperature measures 180ºF on a reliable digital thermometer . Cool to 110º-115ºF before using.
- Add 4 ¼ ounces (1 cup) all-purpose flour and starter to the yeast mixture and stir in until relatively smooth. Let sit for another 10 minutes, or until very bubbly. Add 4 ¼ ounces (1 cup) bread flour, butter, cooled milk, and salt, and beat in using the mixer's paddle attachment on medium-low for about 2 minutes. Add the remaining 12 ¾ ounces (3 cups) all-purpose flour and 8 ½ ounces (2 cups) bread flour and beat in on low speed until a dough begins to form.
- Switch to the dough hook and knead with hook on low speed for about 5 minutes, until the dough is soft and elastic and no longer sticks to the sides of the bowl. If the dough is too sticky, add a bit more bread flour sparingly as needed.
- Shape dough into a round with a smooth top and transfer to a greased bowl about twice its size, turning once to coat dough with cooking spray. Cover with greased plastic wrap and let rise until doubled. (For overnight rising, see notes below.)
- Punch risen dough down gently and let rest for 10 minutes. Meanwhile, dust a surface with cornmeal for rolling out the dough and lay out a few large sheets of parchment paper. Fill a shallow bowl or plate with extra cornmeal. Divide dough in half. Keep one half covered while rolling out other half to ½" thick and use a round cookie cutter, about 3"-3 ½" in diameter, to cut out circles of dough. Dip top side of cut muffins in bowl/plate of cornmeal to coat, and then transfer to a sheet of parchment (well spread out) for second rising, covering with greased plastic wrap. Ball up remaining scraps from first half of dough and cover while repeating process with second half. Once done, kneads scraps from both halves together briefly and shape back into a smooth ball. Let rest for 10 minutes before rolling out and cutting remaining muffins. Let muffins rise, covered, until approximately doubled in size and very puffy.
- Heat your largest skillet/fry pan on medium-low heat for about 2 minutes. Carefully slide a few muffins, one by one, onto a large flat spatula and transfer to pan. Leave space between the muffins as they cook because they will expand. Cover and cook muffins for about 8 minutes, and then carefully flip and cook another 8 minutes or so on the second side. The muffins should be golden-brown and have an internal temperature of 200º-205ºF when done.* Adjust heat and cooking time as needed to ensure that the muffins turn golden-brown but don't burn. Once cooked, transfer muffins to a wire rack to cool while cooking remaining muffins. Serve warm/toasted with melted butter, jam, jelly, etc. Store in an airtight container or zip-top bag at room temperature.
Notes
*If you don't have a kitchen thermometer to measure the internal temperature of the muffins when cooking them, I'd recommend that you split the first one open when you're done to make sure it's fully cooked.
Overnight Rise:
After making the dough, place in the refrigerator to rise overnight. The following day, take the dough out of the refrigerator and, if not yet doubled in size, allow to rise further at room temperature. Once dough has risen to doubled, continue with step 6.
Recipe Adapted From: King Arthur Flour and Simmer Seasonal Recipes
This post contains affiliate links. Links are always for products I personally have used and love.
For more recipes and other food-related tidbits, stick around and subscribe to receive new blog updates by e-mail or RSS. You can also find recipes by category in the recipe index.


Sheri
These turned out great! I had to do 10 minutes each side on medium heat. Thank you!
alexandra
So happy to hear it! Enjoy! :)
Loren
Thank you very much for the recipe! I am waiting for the last rise before cooking them on the griddle. So far, it has been a pretty straightforward recipe, and it's a great way to use my starter! The dough handles like a dream. Quick question - what is the purpose of scalding the milk? What would happen if I just went straight to heating the milk to 110 vs. scalding it first?
alexandra
Scalding the milk gets rid of the enzymes that can kill yeast. :)
Derek
This is a tasty recipe but quite time consuming. Not a high level of difficulty but I'm not sure if the time it takes is worth the final result. I think I'll go back to buying them in store. But, if you are determined to make your own, this recipe is definitely worth trying
alexandra
Homemade bread does tend to be a bit time-consuming, and these more so due to the individual cutting and cooking, but I find it to be worth it as an occasional splurge. Glad you liked them nonetheless. :)
Andrea
I made these last week and we love them. I had been working up the courage to make a sourdough starter and this recipe finally gave me the last little nudge I needed. I have a question, though. How well do these freeze? A full batch will take us a couple of weeks to get through (I made a half batch before) and I want them to stay good the whole time.
alexandra
That's awesome! I'm so happy to hear it!! I haven't tried freezing these myself, but I think that they should freeze quite well in a freezer-safe bag for a few weeks. :)
Thalia @ butter and brioche
I've never thought to make my own english muffins before.. i definitely will be trying this recipe. thanks for the inspiration!
alexandra
Thanks Thalia! I hope you give it a go!
Leah | So, How's It Taste?
Ooo, I've never made my own English muffins, but I should! I just love them with either savory or sweet toppings. Yours look so perfect!
alexandra
Thanks so much Leah!