
Usually, I decide to bake something just because it sounds good to me at the moment. If you know me well enough, you'll know that anything with chocolate typically falls in that category. Plus, there's the constant stream of other random ingredient combinations I come up with that I convince myself are going to be the next best thing. But occasionally, I make something more for the sake of the process than anything else. Tell me that macarons are devilishly tricky to make, or that caramel sauce can't be made without cream, and I'll definitely be itching to take on the challenge just so I can feel super-victorious if when I get it right.
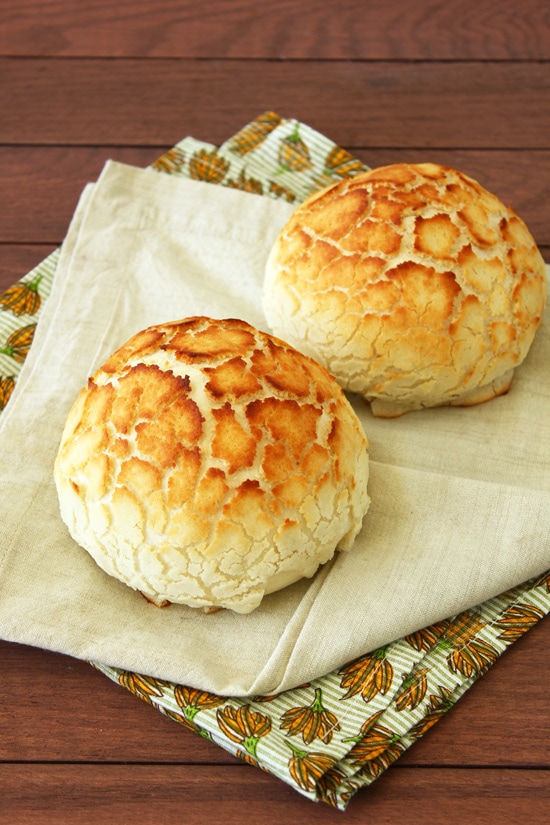
The first time I heard about Dutch Crunch Bread - or Tiger Bread, as it's otherwise known, I seriously thought it was The. Coolest. Thing. Ever. I had no idea what it tasted like, and I don't think I really cared. It just looked awesome, and I was dead-set on making it. Except, I was just the teensiest bit worried that the topping wouldn't turn out right, and it wouldn't look like tiger bread at all. It happens...
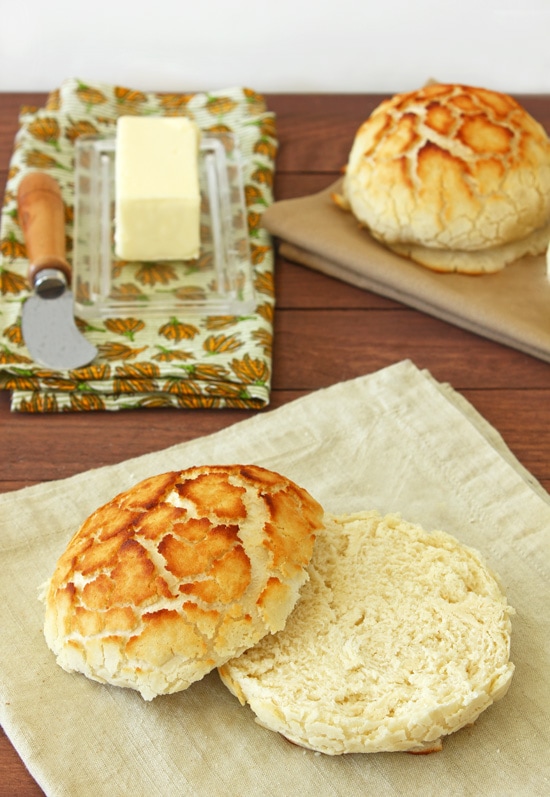
But then I pulled these rolls out of the oven, and I felt like some sort of baking genius, even though these are incredibly easy to make and the topping takes all of 5 seconds to whip together. From what I've learned, the trick is just to make sure you make the topping thick enough, and then give the rolls a nice thick coating. Baking isn't impossible, you just need to know all the tricks. :) Do everything right and you end up with super-soft rolls that have a crispy, tiger-like crust. Pretty awesome, don't you think?
Before I leave you with the recipe, can we please agree on something? This should never have been named Tiger Bread. Last time I checked, tigers have stripes... But apparently we need a super-cute 3-year old girl to tell us this. Go figure.
Dutch Crunch Rolls
Dutch-Crunch Topping puts a unique twist on the classic Soft White Dinner Rolls, giving them a crispy crust with a fun giraffe-like appearance.
- Cook Time: 15 minutes
- Total Time: 15 minutes
- Yield: 6 jumbo rolls
- : Alexandra Azary
Ingredients
Soft White Rolls
- 1 ½ cups milk
- 1 ½ tablespoons butter
- 3 ½ - 4 cups all-purpose flour
- 1 tablespoon active dry yeast
- 1 tablespoon granulated sugar
- 1 tablespoon salt
Dutch Crunch Topping
- 1 tablespoon active dry yeast
- ½ cup warm water
- 1 tablespoon granulated sugar
- 1 tablespoon vegetable oil
- ¼ teaspoon salt
- ¾ - 1 cup rice flour*
Instructions
- Combine the milk and butter in a microwave-safe bowl and microwave for about 1 minute, until the milk is warm and the butter has melted. Stir together, and set aside to cool until lukewarm.
- In a large bowl, whisk together 3 ½ cups flour with yeast, sugar and salt. Add the lukewarm milk and butter mixture and fold in with a spatula until everything is combined in a somewhat sticky dough. If it is very sticky, add a bit more flour. Otherwise, turn the dough out onto a well-floured surface and knead, incorporating the remaining ½ cup flour only as needed, until the dough is elastic, tacky, and smooth.
- Shape the dough into a ball with a smooth top surface and place in a greased bowl roughly double its size. Cover with plastic wrap and leave to rise until doubled in size (for me this took about 2 hours).
- Line a baking sheet with parchment paper. Punch down the dough and divide it into 6 equal pieces**. Shape each piece into a ball by tucking the outer edges underneath and pinching them together as you would a twist-tie. Place the balls of dough pinch-side down on the prepared baking sheet, spaced apart from each other. Cover with plastic wrap and leave to rise for another 30-45 minutes, until puffy.
- Preheat oven to 425°F. Prepare the dutch crunch topping by combining the yeast, warm water, sugar, vegetable oil, salt, and ¾ cup rice flour in a medium bowl. Beat together well to form a smooth, thick "batter" that drips off your whisk in thick clumps. Add up to another ¼ cup rice flour if needed to achieve the desired consistancy. Let the mixture sit for 15 minutes.
- Spoon the topping in equal amounts over the fully risen rolls. As you do so, it will start rolling over the sides of the rolls. Once you've used it all up (it will seem like a lot, but use it all), scoop up any excess topping that has dripped onto the baking sheet and use it to cover any areas of the rolls left exposed.
- Bake the rolls in the preheated oven for about 15 minutes, until golden-brown on top. Cool briefly before serving.
Notes
*I used white rice flour in this recipe, but brown rice flour should work as well. However, be sure to NOT use sweet or glutinous rice flour.
**The 6 rolls I made with this recipe turned out very large - definitely not individually-sized, unless perhaps you're making a large sandwich. Feel free to make the rolls smaller if you'd like (and make more).
White Rolls adapted from Nigella Lawson via The New York Times
Dutch Crunch Topping from The Bread Bible by Rose Levy Beranbaum
via The Daring Kitchen


Tori
I've just tried this recipe; it cracked, but it stays a pasty white color? How do you get it to become golden brown like yours?
alexandra
I'm really not sure why your bread wouldn't have browned if you followed the recipe exactly, but perhaps you might need to bake it a little longer. Oven times will always vary, so it could be that you just need more time for your oven.
Natalie Fletcher
Very excited to see this recipe. Heading to the shops on Tuesday so will be getting some rice flour and giving it a go. I have a bread maker and I do all my breads and dough in it, so will try making the dough that way and then adding the topping. Cant wait :)
alexandra
Yay... Good luck! I haven't tried using a bread maker for this recipe, but I assume you're just going to make the dough in the machine and then bake in the oven? Let me know how it goes!
katt Hack
Heyy!
This looks like a great recipe. Is it possible to just use the dutch crunch topping on any soft rolls and it'll be good?
alexandra
Hi Katt! Yes, the topping should work with other rolls (although I highly recommend these!). Some recipes instruct you to let the topping sit on the rolls for about 20 minutes before baking, so if you're making something other than white rolls, you might want to try that (or experiment both ways). With white rolls like these, I just baked immediately after adding the topping, as explained in the recipe.
JenJen
Hi,
Looks lush, but 'cup' measurement don't exist in London/Europe. I've searched high and low but haven't been able to find a scale that measures in cups. I found a set of 'cups' but they just didn't look right.
So for your friends across the pond, any chance of metric or imperial measures in the future?
Thanks,
JenJen
alexandra
Hi! I don't think you would technically be able to find a scale that measures in cups, because one cup of flour (for example) won't weight the same as one cup of butter, and so on. I've actually started including weight measurements for my newer recipes, but unfortunately, when I made these Dutch Crunch Rolls, I didn't have a scale yet. If I get around to making them again, I'll certainly go back and include the weight measurements on this post. I can give you the typical volume-to-weight conversions I use, but I haven't actually tested the recipe by weight yet.
Flo
Thank you so much for the recipe ! I adapted it with sourdough ! Lovely and terribly tasty :D
http://unflodebonneschoses.blogspot.fr/2013/05/tiger-bread-au-levain.html
alexandra
Such an awesome idea Flo!! You're so welcome. :)
Rose
Hai,
I am a new reader. The rolls looks so nice. I will bake it & thank you for the recipe.
alexandra
You're welcome! Hope you enjoy them. :)
Hannah
These rolls looked so good I just had to try them! I made two small and 6 large ones. They turned out good, but very heavy/thick. Does anyone know how to make them fluffier? They make great sandwich rolls, However, next time I will make them all small. Thanks for the recipe!!
alexandra
Hi Hannah,
There are a few different reasons why your bread might have come out heavy/dense. Firstly, did you make any substitutions to the recipe? Changing the type of flour or yeast in particular will affect the final outcome. Did you notice the bread rising as described in the recipe? If your bread wasn't rising well, your yeast may have been bad or you might have killed it with liquid that was too hot. I always keep my yeast in the freezer too so it doesn't go bad. It's also important to let your bread rise until doubled, even if it takes longer than the time frame given in the recipe. When you were making the dough, did you add a lot of extra flour after the initial 3 1/2 cups? You want your dough to be tacky and smooth, adding as little flour as possible to achieve this. You should also make sure you kneaded your dough until it was nice and elastic. When you shape the rolls, make sure you're shaping them nice and tight so they spring well in the oven.
As far as size, I mentioned that the rolls are large, like sandwich or burger size buns. Feel free to make them smaller, like dinner rolls though.
Let me know if you have more questions, I'm happy to help! I'm glad you still enjoyed the flavor of your bread. :)
LCDC
When we were growing up, these were called alligator rolls. I fondly remember buying these at the Lake Forest Bakery in Clayton in the wee hours of a Saturday morning - because you had to get there early or they'd be gone. Thanks for the recipe - and the memories!
alexandra
Wow, it sounds like this was one popular bread in your hometown! I think alligator rolls are a pretty good name too - better than tiger rolls. :)
Kristie
We have alligator rolls in my area also. We also have to get to the bakery at 5am if you wish to get them. I tried the rolls and they were not quite the same as the bakery we get them from. I've tried to google other tiger bread recipes as well as alligator receipes with not much luck. Thanks for sharing:)
alexandra
I've never had any other tiger bread than this variation that I've made, so for me I had no particular expectations for it to live up to. Sorry to hear it wasn't quite like the alligator rolls you get at your bakery, but hopefully you enjoyed them nonetheless!
Erika
Omg! This was definitely my favorite sandwich bread as a kid. I can't wait to try this!!
alexandra
It's funny how some people grew up with this bread and other people (like me) have never heard of it until now!
Averie @ Averie Cooks
Wow that's just soooo cool looking! I've always wondered how/why some bread does that...so cool to know how to make it!
alexandra
Thanks Averie! I was pretty excited to learn how easy it was to make the bread look like it does too. :)
Belinda @themoonblushbaker
I love these types of rolls. SO good as burger buns because of the crunch. For a twist i like to add flavours to the crust bit like chilli or garlic/onion. it is like easy crispy texture without the deep frying.
alexandra
I love the idea of adding flavors to the topping! I'll have to try that sometime; thanks for the inspiration!
Ashley
I've never heard of tiger bread before but these are so so cool looking! I need to give these a try - I want to see them in person! haha
alexandra
Thanks! That's exactly how I felt when I first saw them. It was like, "Okay, I NEED to see this for myself." :)
Julia | JuliasAlbum.com
Beautiful looking bread! Love your butter knife, too!
alexandra
Thank you! I'm not even sure where the butter knife is from, but I like it too!
natalie @ wee eats
I always wondered how they did that to the top! You're right, they really SHOULDN'T be called "tiger rolls"... given the marks, maybe "giraffe" rolls would be more appropriate lol!
alexandra
Yeah, it's just a little yeast batter that makes the "tiger effect"- other than that, the bread is sort of whatever kind you want it to be, within limits I guess. I thought the simple white rolls were a good match though. Giraffe bread seems way better!
Laura (Tutti Dolci)
I love Dutch Crunch rolls, I'm always tempted to pull of the topping and eat that first!
alexandra
Hah, I always try to save my favorite parts for last. :)