
I can't make things fast.
I try, but I just can't. And one reason why is because my mind always tries to weigh the possibilities, pros, and cons of everything.

Case in point: The other day, I needed to stop by the store on my way home to buy peppermint candy for these marshmallows. It took some debating on my part to even decide whether I needed it. "Well I have soft peppermints at home, but made crunchy would be better... and something that has more red in it..." Those were seriously the thoughts going through my head. Anyway, I decided to get some from the store, which led to me trying to decide where to get it from. "Do I go to the dollar store? It might be cheaper there. But then again, it might not be the kind I want..." So finally I picked a store, got there, and spent at least 5 minutes looking at the different kinds of peppermint candies (of which there are about 9,234,239 during the holidays) until I finally picked the kind I wanted.

Things moved pretty quickly from there, until I got to the checkout and tried to see if I had enough change for the candy. Of course I couldn't manage to get anything but pennies and dimes out of my wallet when I was really looking for the quarters. Eventually, I just resigned to using a credit card to pay for $1 something worth of candy canes. Whoopee.

But you know what makes all of that time worth it? When you get something good out of it, like these Chocolate-Dipped Peppermint Marshmallows. Fluffiest-ever marshmallows, laced with peppermint extract, swirly red on top and dipped into dark chocolate (aka the best stuff ever). I love these because they're so perfect for the season and because I can eat them and not feel too guilty about it. Marshmallows are practically all air, right? Haha :)

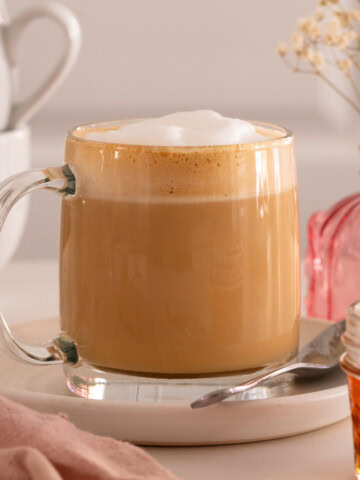
You know what these would go amazingly with? A homemade Peppermint Mocha. I would suggest that you go make both ASAP, and then enjoy the warmth indoors with your blissfully delicious chocolate peppermint treats. You can thank me later. ;)
Chocolate-Dipped Peppermint Marshmallows
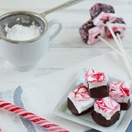
Soft and fluffy Peppermint Marshmallows with a candy-cane swirl, dipped in dark chocolate. There are two ways to make them for a doubly-festive holiday dessert!
- Yield: about 40 jumbo marshmallows
- : Alexandra Azary
Ingredients
- butter, for greasing pan
- confectioner's sugar, for dusting
- 2 envelopes of gelatin (or 2 tablespoons)
- 4 fluid ounces cold water (½ cup)
- 6 fluid ounces boiling water (¾ cup)*
- 14 ounces granulated sugar (2 cups)
- ⅛ teaspoon salt
- ¼ teaspoon peppermint extract
- red food coloring
- 8 ounces bittersweet chocolate chips (1 ⅓ cups) or bittersweet chocolate, chopped
- peppermint candy, for coating (optional)**
Instructions
- Butter an 11" x 7" baking dish and line with parchment paper. Butter the bottom and sides of the parchment and dust generously with confectioner's sugar to cover all of the buttered area.
- In the bowl of a stand mixer, sprinkle the gelatin over the water. Allow to sit while you prepare the syrup so the gelatin blooms.
- In a small saucepan fitted with a candy thermometer and set over medium heat, combine boiling water, sugar, and salt. Whisk frequently until the mixture begins to boil. Once boiling, stop whisking and allow to boil until the candy thermometer reads 236 F***. Remove the syrup from the heat and slowly pour into the mixer over the bloomed gelatin. Add the peppermint extract.
- Beat the ingredients together at medium speed for about 20 minutes, until the mixture is thick and white like marshmallow creme and has expanded substantially. Once it starts to look sticky, particularly around the sides of the mixer bowl, it should be done.
- Butter a spatula (and offset one works well) and pour the marshmallow mixture into the prepared dish. Smooth the top with the back of the spatula, starting at one corner and moving up, down, and across the dish in a swirling motion until you reach the opposite corner. Add about 15 drops of red food coloring, scattered randomly over the top of the marshmallows. Swirl the color around with a toothpick. Place the marshmallows in the freezer, uncovered, overnight.
- Lay out a large piece of parchment paper to use while dipping the marshmallows in chocolate. Remove the marshmallows from the freezer and lift out of the dish using the sides of the parchment. Carefully peel the parchment down from the sides of the marshmallows. Butter a pair of kitchen shears and cut the marshmallows into strips, and each strip into cubes (sized like jumbo marshmallows). Set cut marshmallows on the clean parchment, swirled-side up.
- Bring a pot of water to a simmer on the stove over medium-low heat. Place the chocolate in a bowl over the simmering water and allow to melt, stirring frequently once it begins to melt until it's smooth.
- For the marshmallow pops, stick the tip of a cake pop stick into the melted chocolate, covering about ¾" with chocolate. Stick the chocolate-covered end into the center of a marshmallow on the swirled-side. Leave on the parchment, stick-up, while you repeat with the remaining marshmallows. Once finished, coat each marshmallow with chocolate by using a spatula with a flat tip to push some chocolate up each side. Use the spatula to spoon chocolate onto the bottom of the marshmallow as well (the side opposite the pop stick). Sprinkle peppermint candy pieces over the chocolate, if desired, and then return the marshmallow pop to the parchment, again stick-side up, to allow the chocolate to set. Repeat with remaining marshmallows.
- To make chocolate-covered marshmallows without the pop sticks, simply dip the bottom and sides of each marshmallow into the chocolate, leaving the swirled-side exposed, and return to the parchment, swirl-side up, to set.
- Once the chocolate has set on all of the marshmallows, place them in an airtight container. Marshmallows can be stored at room temperature, but if you don't plan to finish them within a few days, keep them in the freezer so they stay softer. Marshmallows with peppermint candy coating look best the day they are made.
Notes
*Boil more water than needed for the recipe, as the volume of water will decrease as it boils. Measure the ¾ cup needed for the recipe once the water has been brought to a boil. This is also a good time to test your candy thermometer. Fit it to the saucepan you use to boil the water and boil for about 10 minutes. The thermometer should reach boiling temperature (based on your location) by the end of the 10 minutes. If the thermometer reading is incorrect, adjust for the discrepancy when cooking the syrup for the marshmallows. I learned the hard way that this is important!
**If you can find peppermint candy cane sprinkles, I think they would be easier to use than crushing your own peppermint candy. If you do choose to use crushed peppermint, try to avoid crushing the candy too much, or it will get powdery and look messy on the marshmallows. Also, be aware that the peppermint may start to look sticky by the second day.
**I definitely recommend getting a candy thermometer to make marshmallows, but you can also test the syrup by seeing if it has reached the soft ball stage. If you spoon a bit of syrup into a bowl of very cold water, you should be able to clump it into a ball with your fingers, but if you take the ball out of the water, it should string out again.
Marshmallow recipe adapted from: Sugar Plum, originally from Rose Haven Cottage Health
Tessa
Not only do these look delicious, they are beautiful. Great idea!
sally @ sallys baking addiction
ok... i NEED one of these in my life right now. They look completely perfect and I love how festive they are!!!! chocolate and peppermint are a killer combination - and all of that with a marshmallow? Pure heaven.
alexandra
Thanks Sally! I need like everything you bake in my life right now too. :)
Erika
Hi! I was just checking back on Izy's (Top with Cinnamon) blog to see her response and I saw/read your comment...and came to check your blog out! And I LOVE IT! Your photos are seriously SO gorgeous. I aspire to be able to compose photos like you and Izy. Do you have a background in photography? I didn't see it on your about page...
Anyway just wanted to stop by and say that you're doing a fantastic job!
alexandra
Oh my gosh thank you so much! You have no idea how happy your comment made me. And I remember that I mentioned your comment on Izy's site!
I don't really have any background in photography, unless you count a basic class in high school. I've just read and tried to study other people's photography that I admire and practice, practice, practice! This book
is an amazing learning tool; I would definitley reccommend it if you're trying to work on your photography.
Thanks again so much for your comment!
Erika
Ooh wow that book looks great, I'll have to check it out! Maybe I'll put it on my xmas wishlist :) Thanks for the suggestion :))
alexandra
No problem! I still haven't quite finished it yet just because I don't want to be done with it. :) It's amazing!
sandra
Your pictures are beautiful. I think these would go wonderful if you just drop a square in your coffee and let it melt in as you enjoy the cup of Joe! :)
alexandra
Thank youuuu! And you are so right:)
Nik@A Brown Table
My mom taught me to make marshmallows but I really have not tried to make them in a long time. I love this combination of the traditional holiday flavors, everything looks so cute!
alexandra
You should jump back on the bandwagon! So worth it!
Julia | JuliasAlbum.com
Wow! You're making your own marshmallows ?! From scratch?! You're my hero! Do they taste much better than store-purchased? If they do, I might as well get on the wagon and start making them too!
alexandra
Haha the marshmallow hero! I think they're a lot fluffier than the store-bought kind, and maybe even less dry if that makes any sense? I actually think they're a lot of fun to make; it's like food magic happening before you're eyes and you feel like you're some sort of candy-making pro. Plus, you get to add all of the fun flavors and stuff!
Laura (Tutti Dolci)
I love chocolate with peppermint, what a fun idea!
Kare @ Kitchen Treaty
All that thinking definitely paid off. That red hue is gorgeous! These look so yummy and festive. Love.
alexandra
Aww thank you!