
Generally speaking, I would tell you that I can't frost a cake to save my life. And since I'm a semi- complete perfectionist, it drives. me. nuts. Me decorating a cake means me spending at least half an hour smoothing and re-smoothing a layer of frosting, constantly telling myself that "it's almost perfect". Not.
But let's back up here. Do you see this cake? The pink one covered in roses? Because I'm pretty sure that it doesn't look half bad. I'm peaking through my fingertips as I say this, because there are some people out there who make drop-dead-gorgeous cakes, but I was actually over the moon with how great this cake turned out. I did this, you guys. And so can you. It's not half as hard as it might seem.

There's this thing called a pastry bag - maybe you've heard of it? - and it's incredible. ;) Not only can you use it to decorate cupcakes like a pro (which I'm not) but you can actually use it to cover a cake in roses. Incredibly good, cream cheese frosting roses. And I've learned so far that any technique I can use to decorate a cake without an icing spatula is a good one, because that icing spatula layer of mine isn't going to be pleasing to the eyes. But a pastry bag and a steady hand? I can handle that, especially if it lets me pretend like I'm an awesome cake decorator. Which I am now, right? Just kidding - I wish!
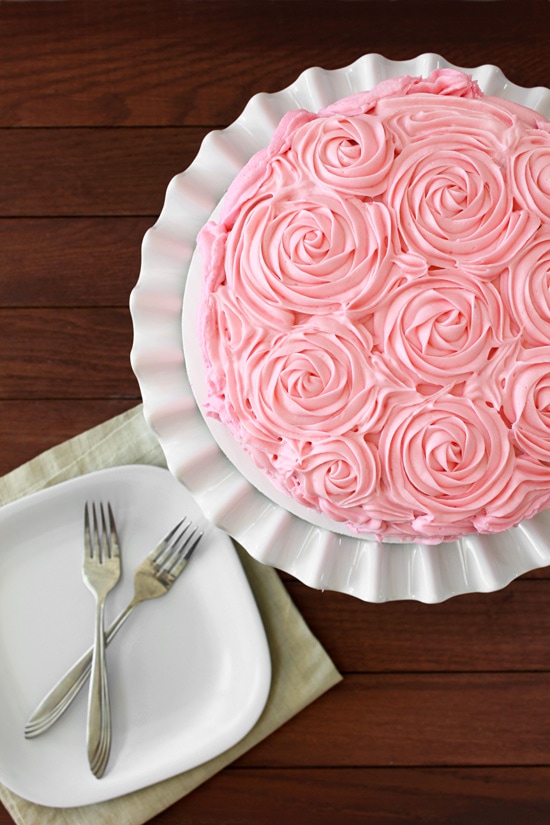
But seriously you guys, looks aren't everything. Let's talk taste. Have you ever heard of Crazy Cake? This is my family's version of Crazy Cake - crazy because it's chocolate cake with no butter and no eggs - AKA my favorite chocolate cake recipe ever. In all its simplicity (this is also a two-step, could-not-be-easier cake) it somehow manages to be incredibly moist and rich and chocolate-y. It's totally good enough to eat by itself, but add two types of cream cheese frosting (chocolate in the middle layer) and you've got a cake that's ten times better than good. While I'm sure there are ladies out there who want their roses for Valentine's Day, I hereby decide that I'd rather eat my roses, in cake form. Who's with me?
Chocolate Cream Cheese Cake
Why give roses when you can give a rose cake? This gorgeous Chocolate Rose Cake makes a lovely treat for Valentine's day or any special occasion. Rich, moist chocolate cake pairs perfectly with two types of cream cheese frosting.
- Cook Time: 35 minutes
- Total Time: 35 minutes
- Yield: 1 9-inch double-layer cake
- : Alexandra Azary
Ingredients
Chocolate "Crazy Cake"
- 3 cups all-purpose flour
- 2 cups granulated sugar
- 6 tablespoons cocoa powder
- 2 teaspoons baking soda
- 1 teaspoon salt
- 2 cups water
- 10 tablespoons vegetable oil
- 2 tablespoons distilled white vinegar
- 2 teaspoons vanilla extract
Cream Cheese Frosting*
- 1 ½ cups unsalted butter, softened
- 10 ounces cream cheese, softened
- 6 cups powdered sugar
- 2 teaspoons vanilla extract
- 2 pinches salt
- 2 tablespoons cocoa powder
- pink icing color (or color of choice)
Instructions
To make the Chocolate Cake:
- Preheat oven to 350°F and butter or grease two 9" cake rounds.
- In a large bowl, sift together the flour, sugar, cocoa powder, baking soda, and salt. Add the remaining ingredients - vanilla, vinegar, oil, and water - and fold in just until evenly combined, with the batter being entirely one color.
- Divide the batter evenly between the two cake pans and bake on the middle rack of the oven for 35 minutes, or just until a toothpick inserted into the center of each cake comes out clean. Let the cakes cool for 20 minutes.
- To remove each cake from its pan, first loosen the edges with a toothpick or your fingertips. Place a large piece of plastic wrap (big enough to wrap one cake) over a cooling rack and place the covered rack upside-down on top of the cake pan so that the plastic wrap is touching the pan. With one hand underneath the cooling rack for support, turn the cake and rack upside down so the cake falls onto the rack, shaken the pan gently if needed. Then, wrap the entire cake up with the plastic wrap and allow it to cool completely. Follow this process for both cakes.
- Once the cakes have cooled, place them in the freezer for thirty minutes while you prepare the frosting.
To make the Cream Cheese Frosting:
- In the bowl of a stand mixer, beat together the butter and cream cheese on medium speed until smooth, wiping down the bowl and beater as needed. Beat in the powdered sugar one cup at a time, incorporating each cup at low speed just enough to prevent the sugar from flying out of the bowl. Once all of the sugar has been added, beat the mixture on medium-high speed until light in texture. Beat in the vanilla extract and salt.
- Transfer the frosting to a separate bowl or container, reserving only ¾ cup in the stand mixer. Add the cocoa powder to the reserved frosting in the mixer and beat it in until evenly combined, wiping down the mixing bowl as needed. This frosting will be for the middle of the cake. For the frosting on the outside of the cake, dip a toothpick in your icing color of choice and swirl it into the frosting that you set aside in a separate bowl. Mix it in with a spatula until the color is even throughout. Repeated as needed to reach your desired color. Place the colored frosting in the fridge.
Assembly
- Place one layer of cake, bottom-up, onto a cake board or serving plate of choice.* Place the cardboard/plate on a rotating cake stand (or a lazy susan) if you have one. Dollop the chocolate frosting onto the cake and use an icing spatula to spread it evenly over the entire top surface of the cake. Then, place the second layer of cake over the first, bottom-side down.
- Take the colored frosting out of the fridge and apply an initial layer of frosting (crumb coat) over the top and sides of the cake to seal in the crumbs and the chocolate frosting in the middle. Be sure to keep your icing spatula clean and free of crumbs while you do this. Return the cake and remaining frosting to the fridge for 30 minutes once you're done.
- Now comes the fun part! Fit a pastry bag with a 1M star tip and fill it with frosting. Keep any extra frosting in the fridge until you need it. Keep in mind that you want to lift up with your hands as little as possible while piping to achieve a cleaner appearance. Pipe the roses along the sides of the cake first. To do this, start where the middle of your rose will be and spiral outwards, trying to end towards the bottom of the cake. Since I made large roses, one rose took up the full vertical space along the sides of the cake, but you could make your roses smaller and do two rows along the sides. Try to keep the roses as close together as possible. Once you're done with the sides, pipe roses over the top of the cake, starting in the very middle and working out towards the edges. After you've made as many roses as will fit on the cake, fill in any blank areas by piping along the same curves as the roses. Once finished, return the cake to the fridge to set the frosting. Bring cake back to room temperature before serving.
Notes
*If desired, you can cut 4 strips of parchment to place around the outer edges of your plate before setting the cake on top to protect the plate from getting messy. If you choose to do this, I would recommend pulling these strips out from under the cake before frosting the roses on top. It's a little difficult to pull them out, though.
Cream Cheese Frosting Adapted From: I Heart Baking
Rose Frosting Technique Adapted From: I am Baker

AJ
Is it possible to make a 6in round cake that has 5 layers with this recipe?
Out of a hundred recipes your is the one I want to try!!! Fingers crossed
alexandra
It would probably work; you might be a tiny bit short on batter but probably not enough to warrant making any changes unless your cake pans are taller (mine were probably about 1.25-1.5" tall).
Nat
Hi. This may sound like a silly question but I don't usually bake..Ever. I've made the cake for a birthday tomorrow. Is it best to store the cake in fridge or pantry? I have put the icing on yet so I also wonder if it's better to put the icing on tomorrow? Thanks so much if anyone with more baking knowledge could get back to me.
alexandra
I'd suggest frosting the day you plan on serving. In the meantime, I'd wrap it tightly in plastic wrap and store at room temp.
Leah
I'm so excited that I found this post! I am making a Rose cake for my daughter's first birthday. My son wants it to be chocolate and I only have 9" pans...
alexandra
Yay - I hope it turns out great! (I love that your son is dictating your daughter's cake flavor.) ;)
DMI
Is this natural cocoa or Dutch process?
alexandra
It should actually work with either. :)
Patricia
I'm going to celebrate my 18 birthday soon, and I was searching for a cake recipe. I've found this one and I'm totally in love with it!
It's one of most beautiful rose decorated cakes I've seen, and I would to bake it but I'm not a big fan of frosting (especially cheese frosting) and I got a question - it is possible to make the roses with chocolate cream or something simullar?
Thank you for answer and sorry for my bad English :)
alexandra
Happy Birthday (almost)! I'd love to help you out but I am wondering what exactly you mean by chocolate cream... can you explain that one to me? Also, have you tried a swiss meringue buttercream before? It's quite different from normal frosting and not as sweet, so perhaps you'd like that. It would work well here. :)
Patricia
Thank you :)
I'm thinking about cream made of :
180 g of dark chocolate
90 g of butter
125 g of sweet condensed milk
You have to melt the chocolate, butter and milk in two layered pot when the water is simmering, later you let cream to cool off and put it inside the pastry bag.
I hadn't tried that frosting yet, but maybe I will, thank you :)
Tania
Hi Alexandra
I love your cake and would really like to try the rose decoration. But I have one question, which cream cheese did you use? We get a softer type of cream cheese (almost like cottage cheese but a bit thicker) as well as a harder brick type cream cheese. Which one should I use? I am just afraid that maybe my roses won't hold if I use the softer one, or that the icing won't mix well if I use the harder brick type cream cheese. Please can you help.
Thanks so much!
Tania
alexandra
Hi Tania! Thanks for the compliment on the cake! When I made this cake, I used Raskas cream cheese. It was firmer than the Philadelphia block I can get in the supermarket, but it was also packed into individual 1 ounce containers which may be why it was more firm. That being said, many bakers specifically recommend Philadelphia for baking, and I used a Philadelphia block in my mini ruffle cakes, which also worked well. Either of these brands should work. Does that help?
Jess
I've been searching for recipes and tutorials to make this type of cake for my daughter's birthday. Yours looks beautiful, and I'm so excited to find a recipe for icing that doesn't call for "Crisco" - whatever the heck that is! As I am a COMPLETE novice - what are the 'lay terms' for granulated sugar and powdered sugar? Is this just caster sugar and icing sugar? Cheers!
alexandra
Thank you Jess! I know your daughter would love this cake! Crisco is vegetable shortening, but I never use it in my frosting. Granulated sugar is just your typical sugar that you use for baking. Caster sugar is finer, but not as fine as powdered sugar. You should be able to find granulated sugar at any grocery store. Powdered sugar is the same as icing sugar. :) If you have any other questions, let me know!
Ellen @ Indigo Scones
Ohhh my gosh, you did such a gorgeous job on the frosting! I've yet to use the rose technique, but I really want to try it. Dang, girl.
Karen
I've been following blogs for quite a while now and this is one of the most beautiful cakes I have ever seen! You're certainly not a lousy cake froster, you've got it nailed! I really want to try to make this cake for my daughter's birthday.
alexandra
Thank you so much! That's an incredibly sweet thing to say. I really do struggle with cake decorating, and I wanted everyone to know how "doable" this cake is. If I can do it, you can too! Let me know if you try it out for your daughter; I bet she'd love it!
Laura (Tutti Dolci)
Your cake is so pretty! (I just wish I had steady hands :))
alexandra
Thanks Laura! You do need steady hands for this one, but other than that, it's pretty easy actually!
Ashley
Your cake is beautiful!! I've wanted to try something like this for a while but have no reason to make a cake... I think I need to find some excuse to make one haha Too bad there are no birthdays coming up...
alexandra
Aww thank you! I'm the same way; I never have reasons to make cake. I jump at any birthday excuse, but they don't come too often. :( I was so excited to try this technique though, so I'm really glad I got a chance!