Chocolate Cream Cheese Cake
Why give roses when you can give a rose cake? This gorgeous Chocolate Rose Cake makes a lovely treat for Valentine's day or any special occasion. Rich, moist chocolate cake pairs perfectly with two types of cream cheese frosting.
- Cook Time: 35 minutes
- Total Time: 35 minutes
- Yield: 1 9-inch double-layer cake
- : Alexandra Azary
Ingredients
Scale
Chocolate "Crazy Cake"
- 3 cups all-purpose flour
- 2 cups granulated sugar
- 6 tablespoons cocoa powder
- 2 teaspoons baking soda
- 1 teaspoon salt
- 2 cups water
- 10 tablespoons vegetable oil
- 2 tablespoons distilled white vinegar
- 2 teaspoons vanilla extract
Cream Cheese Frosting*
- 1 1/2 cups unsalted butter, softened
- 10 ounces cream cheese, softened
- 6 cups powdered sugar
- 2 teaspoons vanilla extract
- 2 pinches salt
- 2 tablespoons cocoa powder
- pink icing color (or color of choice)
Instructions
To make the Chocolate Cake:
- Preheat oven to 350°F and butter or grease two 9" cake rounds.
- In a large bowl, sift together the flour, sugar, cocoa powder, baking soda, and salt. Add the remaining ingredients - vanilla, vinegar, oil, and water - and fold in just until evenly combined, with the batter being entirely one color.
- Divide the batter evenly between the two cake pans and bake on the middle rack of the oven for 35 minutes, or just until a toothpick inserted into the center of each cake comes out clean. Let the cakes cool for 20 minutes.
- To remove each cake from its pan, first loosen the edges with a toothpick or your fingertips. Place a large piece of plastic wrap (big enough to wrap one cake) over a cooling rack and place the covered rack upside-down on top of the cake pan so that the plastic wrap is touching the pan. With one hand underneath the cooling rack for support, turn the cake and rack upside down so the cake falls onto the rack, shaken the pan gently if needed. Then, wrap the entire cake up with the plastic wrap and allow it to cool completely. Follow this process for both cakes.
- Once the cakes have cooled, place them in the freezer for thirty minutes while you prepare the frosting.
To make the Cream Cheese Frosting:
- In the bowl of a stand mixer, beat together the butter and cream cheese on medium speed until smooth, wiping down the bowl and beater as needed. Beat in the powdered sugar one cup at a time, incorporating each cup at low speed just enough to prevent the sugar from flying out of the bowl. Once all of the sugar has been added, beat the mixture on medium-high speed until light in texture. Beat in the vanilla extract and salt.
- Transfer the frosting to a separate bowl or container, reserving only 3/4 cup in the stand mixer. Add the cocoa powder to the reserved frosting in the mixer and beat it in until evenly combined, wiping down the mixing bowl as needed. This frosting will be for the middle of the cake. For the frosting on the outside of the cake, dip a toothpick in your icing color of choice and swirl it into the frosting that you set aside in a separate bowl. Mix it in with a spatula until the color is even throughout. Repeated as needed to reach your desired color. Place the colored frosting in the fridge.
Assembly
- Place one layer of cake, bottom-up, onto a cake board or serving plate of choice.* Place the cardboard/plate on a rotating cake stand (or a lazy susan) if you have one. Dollop the chocolate frosting onto the cake and use an icing spatula to spread it evenly over the entire top surface of the cake. Then, place the second layer of cake over the first, bottom-side down.
- Take the colored frosting out of the fridge and apply an initial layer of frosting (crumb coat) over the top and sides of the cake to seal in the crumbs and the chocolate frosting in the middle. Be sure to keep your icing spatula clean and free of crumbs while you do this. Return the cake and remaining frosting to the fridge for 30 minutes once you're done.
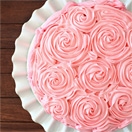
- Now comes the fun part! Fit a pastry bag with a 1M star tip and fill it with frosting. Keep any extra frosting in the fridge until you need it. Keep in mind that you want to lift up with your hands as little as possible while piping to achieve a cleaner appearance. Pipe the roses along the sides of the cake first. To do this, start where the middle of your rose will be and spiral outwards, trying to end towards the bottom of the cake. Since I made large roses, one rose took up the full vertical space along the sides of the cake, but you could make your roses smaller and do two rows along the sides. Try to keep the roses as close together as possible. Once you're done with the sides, pipe roses over the top of the cake, starting in the very middle and working out towards the edges. After you've made as many roses as will fit on the cake, fill in any blank areas by piping along the same curves as the roses. Once finished, return the cake to the fridge to set the frosting. Bring cake back to room temperature before serving.
Notes
*If desired, you can cut 4 strips of parchment to place around the outer edges of your plate before setting the cake on top to protect the plate from getting messy. If you choose to do this, I would recommend pulling these strips out from under the cake before frosting the roses on top. It's a little difficult to pull them out, though.