
As much as I love cake, I don't get a chance to make it that often because, let's face it, I don't need a whole 9-inch cake to eat by myself. I realize that's probably the whole reason why cupcakes were invented, but there's something a little more fun about making cakes, don't you think? You get to stack tiers of cake with layers of frosting in the middle, hone your clumsy improving frosting skills, and decorate to your heart's content until you wind up with a little culinary masterpiece of your own. That's why I was SO excited when I learned about the idea for making a cupcake cake from Stephanie of 52 Kitchen Adventures. Finally, a way to literally have my cake and eat it too, without committing myself to some sort of cake-eaters intervention. :D It's actually super easy to make your own little Cupcake Cake, and the finished product turns out pretty darn cute.
I mentioned this cupcake cake in my last post for Mini Vanilla Bean Ruffle Cakes, but I wanted to write a separate post with some step-by-step photos, since this method can be used to make any sort of cupcake cake you'd like. So without further ado, let's get started!
Start with your favorite cupcake (choose one that doesn't fall apart very easily). You'll need two cupcakes for one cupcake cake. Wrap the cupcakes tightly in plastic wrap and freeze for 30 minutes before starting. This will make them easier to work with.
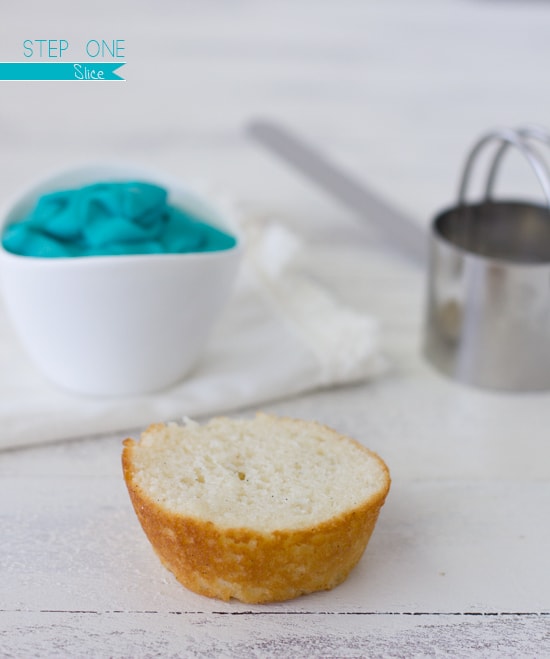
Slice the dome off the top of the cupcake so the top is flat.
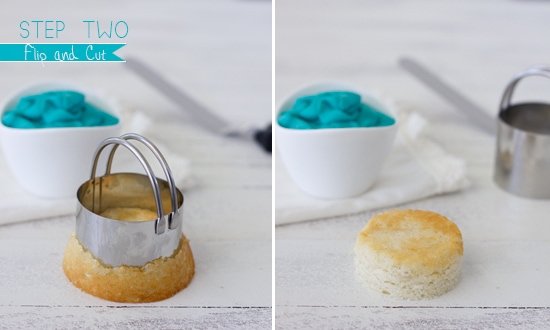
Flip the cupcake over and use a 2-inch cookie cutter to cut the slanted sides off the cupcake, leaving you with a nice round cupcake layer.

Repeat steps one and two with a second cupcake so that you have two tiers for your cupcake cake.
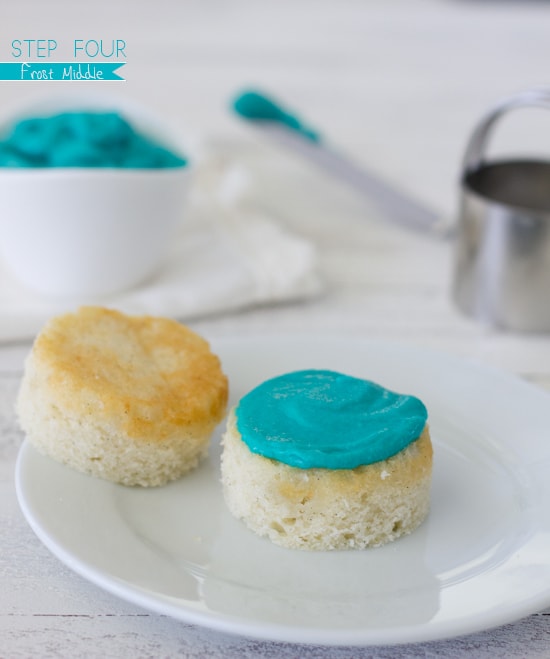
Place one cupcake tier bottom-up on your serving plate and spread a thin layer of frosting on top.
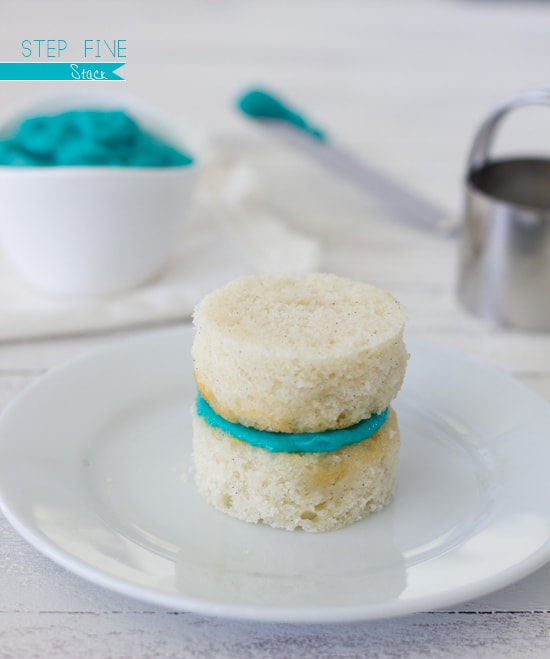
Place the second cupcake tier, bottom-down, over the first.
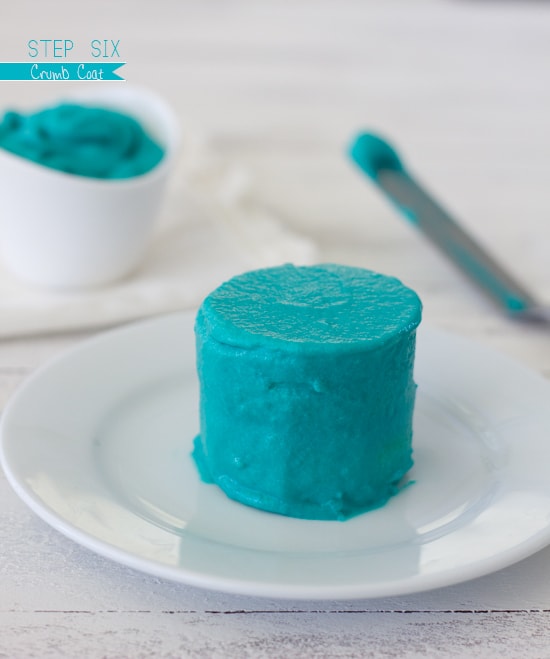
Apply a thin layer of frosting (crumb coat) over the top and sides of the cupcake cake. Refrigerate the cake (covered, if possible) for 30 minutes before continuing.
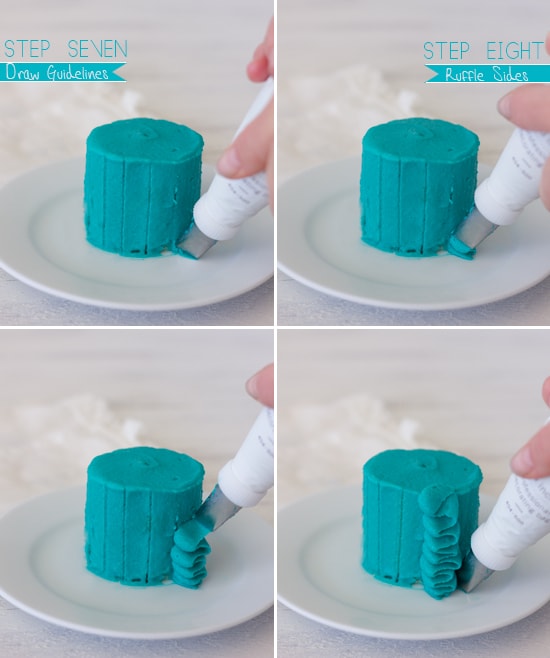
Use a thin metal skewer or toothpick to mark vertical guidelines around the sides of the cake for the width of each ruffle. Then, use a piping bag fitted with a petal tip (like Wilton #103 or #104) to pipe ruffles around the sides of the cake. Holding the piping bag at a 45º angle, use a steady left and right motion to pipe the ruffles, working your way up the sides of the cake. End each ruffle by piping slightly over the top of the cake, ending in the same direction with each ruffle.
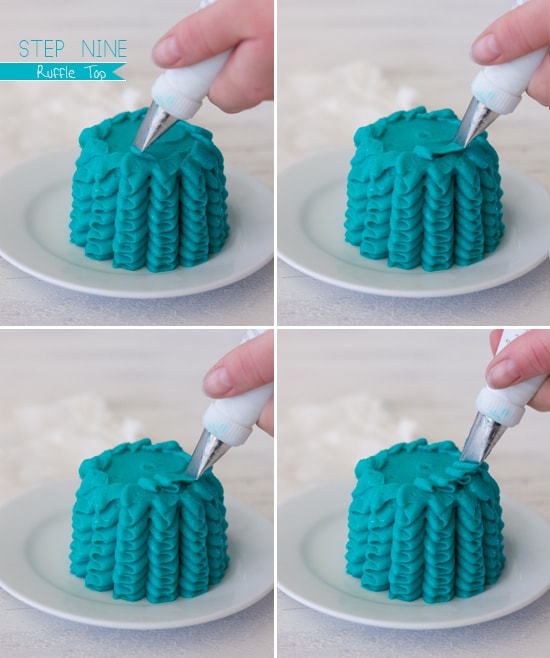
Pipe ruffles around the top of the cake, starting at the outermost part and working circularly inwards until you reach the middle. Use a forward and back motion to pipe the ruffles.
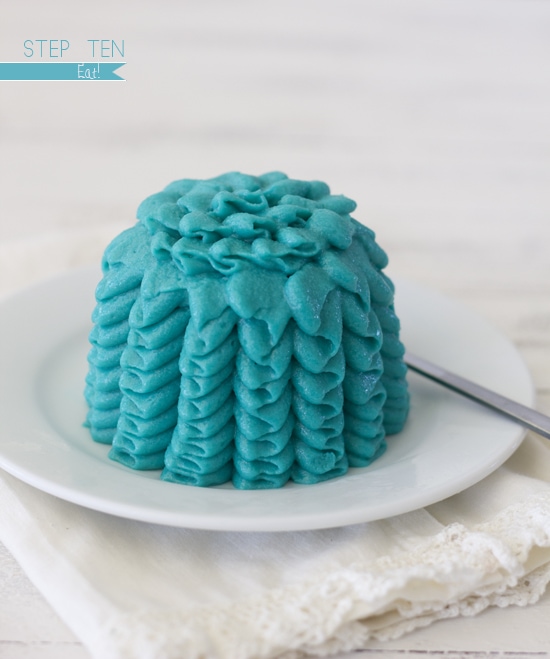
Dig in!
How to make a Cupcake Cake with Ruffle Frosting
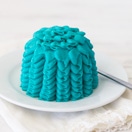
Turn your favorite cupcake into an adorable mini cupcake cake with these simple step-by-step instructions!
Ingredients
- Cupcake of choice* (2 cupcakes for one cupcake cake)
- Frosting of choice*
You'll also need:
- offset spatula
- piping bag with small petal tip (such as Wilton #103 or #104)
- rotating cake stand (optional)
Instructions
- Wrap cupcakes tightly in plastic wrap and freeze for 30 minutes before starting.
- Slice the dome off the top of each cupcake so the tops are flat.
- Flip the cupcakes over and use a 2-inch cookie cutter to cut the slanted sides off, leaving you with two round cupcake layers.
- Place one cupcake layer bottom-up on your serving plate (set on a rotating cake stand, if possible) and spread a thin layer of frosting on top.
- Place the second cupcake layer, bottom-down, over the first.
- Apply a thin layer of frosting (crumb coat) over the top and sides of the cupcake cake. Chill cake in the refrigerator for 30 minutes (covered, if possible) before continuing.
- Use a thin metal skewer or toothpick to draw vertical guidelines around the sides of the cake for the width of each ruffle. Then, use a piping bag fitted with a petal tip to pipe ruffles around the sides of the cake. Holding the piping bag at a 45º angle, use a steady left and right motion to pipe the ruffles, working your way up the sides of the cake. End each ruffle by piping slightly over the top of the cake, ending in the same direction with each ruffle.
- Pipe ruffles around the top of the cake, starting at the outermost part and working circularly inwards until you reach the middle. Use a forward and back motion to pipe the ruffles.
- Dig in!
Notes
*I suggest using a cupcake that doesn't fall apart too easily and a frosting that isn't too limp to hold the shape of the ruffles. The cupcake and frosting I used are from this recipe.

Laura (Blogging Over Thyme)
Adorable! Love it. I've heard of turning cupcakes into cakes--but more so, in the obvious (less creative) way of literally cutting it in half and making a sandwich of sorts, haha. Love this idea. Would be such a fun bday gift for a friend!
alexandra
Yup, it would be perfect for a birthday gift! And thanks so much! I have a feeling this might be a little easier to eat than smashing two cupcakes together anyway. :)
Aya @sukarah
This has got to be the cutest cupcake I ever saw! The ruffles are so elegant.
alexandra
Thank you Aya!
alexandra
Aww thank you!
Ashley
I love this! Now I can try this frosting technique without having to make a whole cake - genius!
alexandra
Exactly!!
Rosie @ Blueberry Kitchen
Thanks so much for this tutorial - I love the look of ruffle frosting, I really want to try this!
alexandra
You should try it! I'm not even a huge fan of mini desserts, but I love the mini cake. Plus, the ruffle frosting is so cute. :)
Ellen @ Indigo Scones
Beautiful! I must try this technique sometime.
alexandra
Thanks Ellen:) You should, it's fun!
Averie @ Averie Cooks
Well isn't this just the most adorable tutorial ever! :)
alexandra
Haha thanks Averie!
Laura (Tutti Dolci)
Love how simple this is!
Rebecca
Looove this tutorial :D Thanks a lot for it :)
alexandra
Thanks Rebecca!And you're welcome. :)