

I have this theory that everyone has a few questions they get asked all the time - the kind of questions that you almost memorize answers for because you're so used to saying the same thing. It's like the whole "What's your major?" for a college student, one of those things that people just automatically ask when they learn something about you. For me, people find out that I'm a baker and a food blogger and they always have the same question: "What's your favorite thing to bake?" (It's probably written in some book about conversation openers for bakers, because I can't even count the number of times I've had to answer that question.)
Because I like to live on the wild side and all that - hah - I actually have two answers to this question, and one of them is C A K E. But the thing about cake is, it's not so much that cake is my favorite dessert, or that the physical baking of the cake is more fun than baking other things. I just have a never-ending desire to frost cakes and decorate them every which way and create edible artwork that's too pretty not to stare at. The only problem is that I live in a fantasy world where cake-decorating is a breeze and comes naturally to me. But really? Not so/I wish.
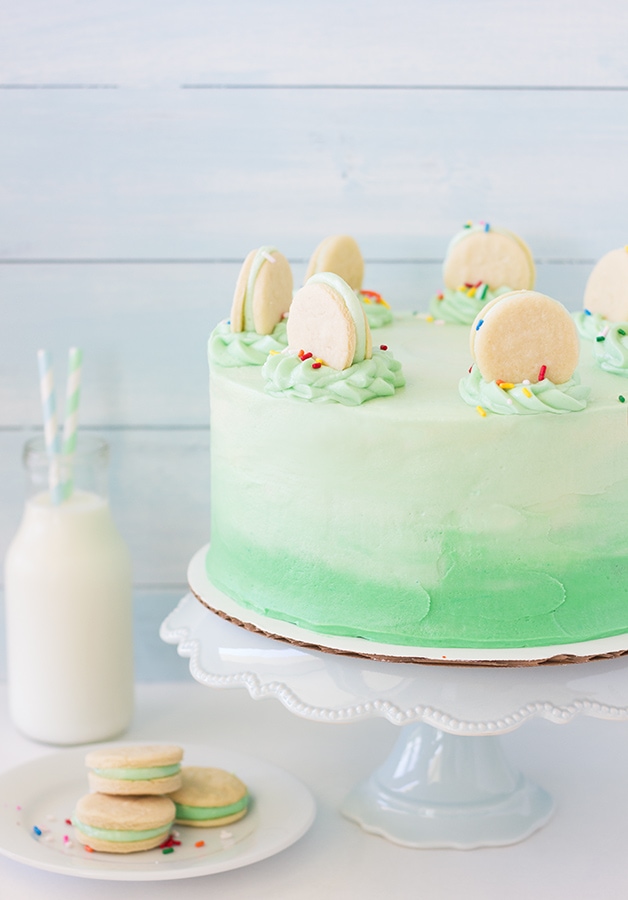
The story of me making a cake is a mixture of excitement and anticipation and hours spent in the kitchen and frosting allllll over everywhere and huge messes and - finally - a cake that (hopefully) makes me so happy I forget about all the chaos that went into making it. And if that's the truth, then this cake was my novel because ohmygoodness was it a labor of love but so totally worth it in the end. A long while back I tried doing an ombré cake for the first time, and I've really wanted to share one ever since. Thankfully, my second attempt was loads better than my first. (You're eyes can be happy about that). :D
I wanted to make this one extra-colorful so I did a funfetti cake based off my favorite vanilla cake recipe, and I have to confess that even though I've never been a funfetti lover, it can be pretty fantastic when you ditch the boxed stuff and do it right. And the sprinkles - I'm just going to be corny and admit that I love them because they're happy looking in a way that only food can be. The cake comes out tender, moist, slightly dense in a good way, and packed to the brim with sweet vanilla flavor, which means it balances perfectly with a not-too-sweet cream cheese frosting that makes my heart sing. The ombré frosting technique can be intimidating at first, but it actually embraces a not-so-perfect form of perfection (if that makes sense at all), and it's definitely doable. I was already content to just stare at the cake and never slice into it, but it was even better to see that it was such a big hit that it disappeared at record speed.
P.S. I knowwww I didn't show the inside of the cake in the photos and I hate myself for that because it is a funfetti cake and it's so fun and colorful, but since this was for a birthday and it got devoured right away, that wasn't really an option. Soooo, I hope you trust me when I say it's super cute and tastes amazing!
PrintFunfetti Cake with Ombré Frosting
Tender, sweet and moist Vanilla Funfetti Cake layered with a slightly tangy Cream Cheese Frosting makes for a cake that's perfect for any kid-at-heart. Plus, this gorgeous ombré frosting technique adds a fun, colorful touch that will definitely wow a crowd.
- Cook Time: 30 minutes
- Total Time: 30 minutes
- Yield: one 8"-9" 3-tier cake
- : Alexandra Azary
Ingredients
Vanilla Funfetti Cake
- 1 lb 4 ⅛ ounces (4 ¾ cup, spoon and level) all-purpose flour
- 2 tablespoons baking powder
- 1 teaspoon salt
- 12 ounces (1 ½ cups or 3 sticks) unsalted butter, room temperature
- 19 ¼ ounces (2 ¾ cups) vanilla sugar (or granulated sugar)
- 9 egg whites, room temperature
- 17 ounces (2 cups) buttermilk, room temperature
- 2 teaspoons vanilla extract
- ½ teaspoon almond extract
- 6 ounces (1 cup) rainbow jimmies (sprinkles)
Cream Cheese Frosting
- 16 ounces (2 cups or 4 sticks) unsalted butter, softened
- 16 ounces cream cheese
- 40 ounces (10 cups) confectioner's (powdered) sugar, sifted
- 2 teaspoons vanilla extract
- ¼ teaspoon almond extract
- ¼ teaspoon salt
- gel food coloring(s) of choice
Garnishes
- small roll-out butter/sugar cookies
- rainbow jimmies sprinkles
Instructions
Vanilla Funfetti Cake
- Preheat oven to 350ºF. Butter three 8"-9" round cake pans*, line bottoms with parchment rounds, and dust with flour, tapping out excess.
- Sift the flour, baking powder, and salt into a bowl and whisk together.
- In the bowl of a stand mixer fitted with the paddle attachment, cream together the butter and sugar on medium-high speed until light, fluffy, and smooth. Reduce the speed to medium and add the egg whites gradually, beating each addition in until well-incorporated into the mixture. Wipe down the bowl and beater as needed.
- Separately, whisk together the buttermilk, vanilla extract, and almond extract.
- With the mixer on lowest speed, add the dry ingredients and the buttermilk mixture to the batter in thirds, alternating between each. Begin and end with the dry ingredients. Wipe down the bowl and beater as needed during this process and mix just until all ingredients are almost evenly incorporated, but still a bit streaky. Add the sprinkles in two parts, folding in by hand just until dispersed throughout the batter.
- Divide the batter evenly between the three cake pans (using a kitchen scale if possible for accuracy) and smooth out the tops with an offset spatula.
- Bake in the preheated oven for 30-35 minutes, rotating pans after 20 minutes, until a toothpick inserted into the center of each comes out clean. Allow the cakes to cool in pans on a wire rack for 10 minutes, and then turn over onto wire rack and remove parchment layer. Once completely cooled, wrap tightly in plastic wrap and freeze in a zip-top bag in the freezer for 30 minutes to 1 hour prior to decorating.
Cream Cheese Frosting
- In the bowl of a stand mixer fitted with the paddle attachment, beat the butter and cream cheese together until light and creamy, stopping occasionally to wipe down the bowl and beater as needed.
- With the mixer on lowest speed, slowly add the confectioner's sugar. Once all has been partially mixed in, increase speed to medium-high and continue to beat until light, fluffy, and smooth, again wiping down bowl and beater as needed.
- Add the vanilla extract, almond extract, and salt and beat in until evenly incorporated.**
Assembly
- Remove cakes from freezer and use a large serrated knife to level off tops as needed (but save the scraps to eat!) Place the first layer on a cardboard cake round set on a rotating cake stand, with strips of parchment placed partially underneath the cake on all sides to protect the cake board from excess frosting. (This will make it easier to get a clean final presentation).
- Place a large dollop of frosting over the first cake layer and use an offset spatula to smooth into an even layer that covers the top surface of the cake. Place second cake layer on top and repeat. Top with third cake layer and then coat the entire cake with a thin layer of frosting to seal in lose crumbs (aka a crumb coat). Refrigerate cake for 30 minutes - 1 hour, until crumb coat has set.
- Meanwhile, divide remaining frosting into 3 equal portions in separate bowls and use gel coloring(s) to tint each portion a different shade or color as desired. (Different shades of the same color or complimentary colors will work best for this technique.)
- Remove cake from refrigerator and add a very large dollop of desired frosting color to top of cake. Use offset spatula to spread into a flat layer and push excess frosting over edges, working until top of cake is fairly smooth and neat. Add second frosting color to bottom ⅓ of cake and spread to cover. Finally, add last frosting color to middle ⅓ of cake to cover. Use offset spatula or palette knife to smooth out sides of cake while removing excess frosting and gently blending different colors to achieve ombré effect. Be careful not to work the cake so much that you loose the various shades of color.
- Use offset spatula to wipe off any excess frosting around top perimeter of cake by pushing towards center at an angle and carefully pulling up, dipping spatula in hot water and wiping dry frequently as you go to help the frosting smooth out as much as possible. Once done, frosting should be smooth all around.
- To decorate, use some of excess frosting to pipe large dollops around top perimeter of cake (I did this with an Ateco 827 open star tip ). Sandwich cookies with more of leftover frosting (I piped it on each with an Ateco 804 round tip ) and carefully press one into each dollop of frosting as pictured in photographs above. Sprinkle frosting dollops with rainbow jimmies.
- Keep cake refrigerated until ready to serve. Store any leftovers in an airtight container in the refrigerator.
Notes
*The original recipe calls for three 8" x 2" round cake pans, but I used 8 ½" by 1 ½" pans. Three 9" pans should also work as well, just yielding slightly thinner layers.
**At this point, if you plan to use three different shades of the same color for your ombré design, you can color all of the frosting the lightest shade before filling between layers and crumb-coating. Otherwise, leave the frosting white for now.
For a helpful visual, I highly recommend Sweetapolita's video tutorial for the ombré frosting technique.
Cake adapted from Sweetapolita . Frosting is a Bright-Eyed Baker Original.
This post contains affiliate links. Links are always for products I have personally used and love. :)
For more recipes and other food-related tidbits, stick around and subscribe to receive new blog updates by e-mail or RSS. You can also find recipes by category in the recipe index.

![]()
![]()
![]()
![]()
![]()
![]()
![]()

Lindsey @ American Heritage Cooking
Love these photos! And I love your answer to that stale question! Mine is, "umm, umm, cupcakes, i guess" ;-)
alexandra
Haha thank you Lindsey!
Jessica
This cake is beautiful! I'm on vacation but am totally gonna make it when I get home!
alexandra
DO IT! :)