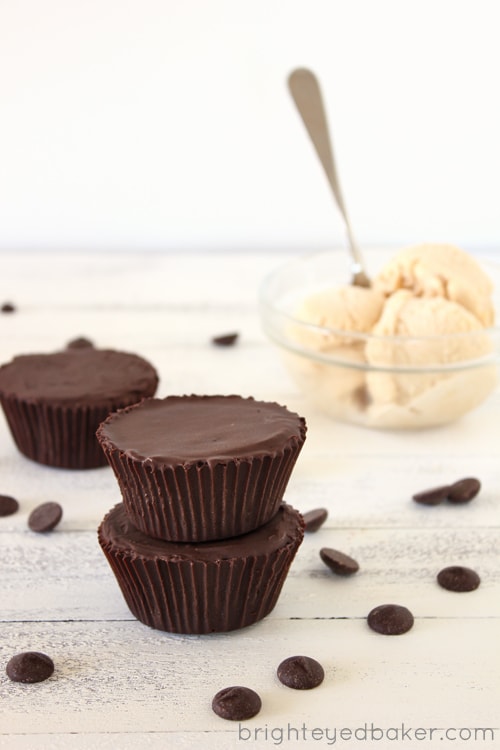
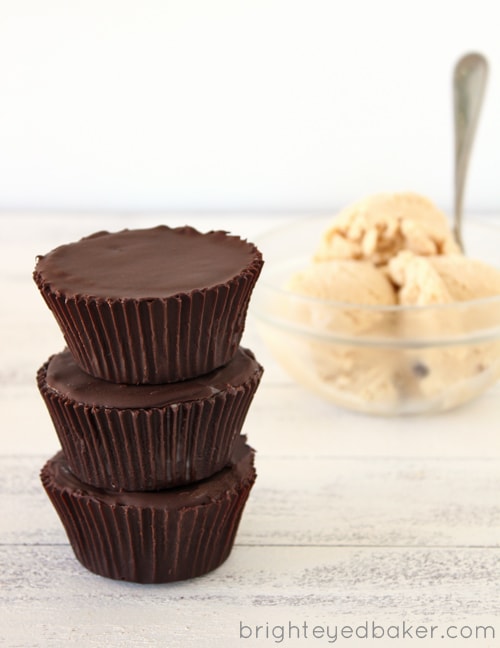
Creamy Peanut Butter Ice Cream + Chocolate Cupcake + Edible Chocolate Cups = Ice Cream Cupcake Peanut Butter Cups = Frozen Indulgence x 10.
I made these about two and a half weeks ago and I've waited until now to share them. Guilty.
Back in the very beginning of June, I heard about the 2012 Ice Cream Cupcake Contest. Basically, the rules are that you have to concoct some sort of combination of ice cream and cupcake. And basically, I heard the words "ice cream" and "cupcake" and I was in.
My gears started ticking right away, my concentration quickly shifted to all things sweet, and I was tossing ideas around in my head all day until I finally came up with the right idea, the idea that I liked and that I could also see fleshed out. It was a little ambitious in my mind, as I wasn't quite sure if everything would work out exactly as I pictured, but I was set on trying. And... It Worked! Score 1 for the girl who probably had chocolate all over herself by the end of the day. :)
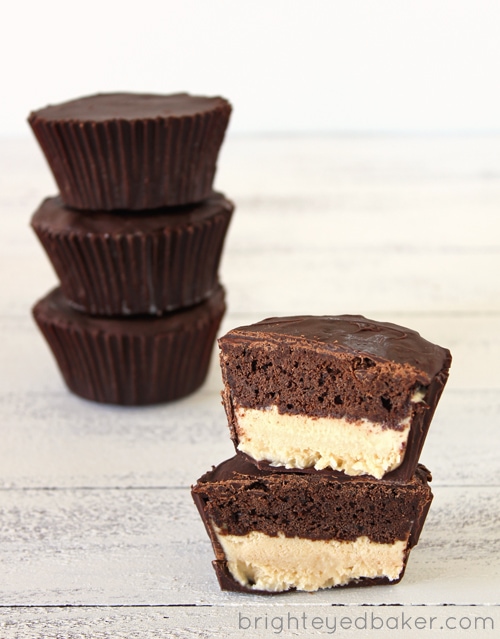
Here's the breakdown: You make chocolate cups just like you'd see for any peanut butter cups, ridges and all, to act as the edible packages for these frozen treats. Then you fill them halfway with to-die-for, who-knew-I'd-be-crazy-about-this Peanut Butter Ice Cream (it's David Lebovitz', so you know it's good). On top of the ice cream you add half a freshly baked Chocolate Cupcake. Then, you seal the package with more chocolate, and you've got yourself Ice Cream Cupcake Peanut Butter Cups. Then you grab a bowl (because things might get messy) and dig in.
P.S. This recipe has a lot of steps, but I really laid it all out in detail for you (below) to make it easier. Don't be intimidated by the length!!
PrintIce Cream Cupcake Peanut Butter Cups
Kick Peanut Butter Cups up a notch by filling them with Chocolate Cupcakes and Peanut Butter Ice Cream!
- Cook Time: 20 minutes
- Total Time: 20 minutes
- Yield: 12 peanut butter cups 1x
Ingredients
Chocolate Cups
- generous 2 cups good quality chocolate chips or chopped chocolate, divided*
Peanut Butter Ice Cream
- ¾ cup smooth peanut butter
- ¾ cup granulated sugar
- 2 ⅔ cup half-n-half
- ¼ teaspoon vanilla
- pinch of salt
Chocolate Cupcakes
- ⅜ cup unsweetened good quality cocoa powder
- ⅜ cup all-purpose flour
- ¼ teaspoon baking powder
- ⅛ teaspoon salt
- ¼ cup butter, softened (½ a stick)
- ½ cup granulated sugar
- 1 egg plus 1 egg yolk
- ½ teaspoon vanilla
- ¼ cup yogurt (Use any kind; I used nonfat Greek yogurt)
Chocolate Top Coat
- 1 cup good quality chocolate chips or chopped chocolate*
Instructions
Method of Preparation**
- Do the first coating for the chocolate cups.
- While the cups are freezing after the first coating, prepare the mixture for the peanut butter ice cream. Chill in fridge.
- Do the second coating for the chocolate cups.
- While the cups are freezing again, make the chocolate cupcakes.
- While the cupcakes are cooling, peel the liners off of the chocolate cups. Freeze until ready to assemble peanut butter cups.
- Once the cupcakes are cool, churn/freeze the peanut butter ice cream. Meanwhile, slice the cupcakes to prepare for assembly.
- Assemble the peanut butter cups as soon as the ice cream has finished churning, or freeze the ice cream for no more than one hour after churning and then assemble.
- Freeze the assembled cups.
- Add the final chocolate coating to the tops of the cups.
- Freeze until ready to serve.
Make the Chocolate Cups:
- Line 12 cups in a standard size muffin tin with paper liners. It seems helpful to place a drop of honey in the bottom of each muffin cup and press the paper liners in on top so that they stick. This way, they won't move around quite as much when you're coating them with chocolate. Be sure to use muffin liners that fit your tin well and don't scrunch up inside.
- Melt a generous cup of chocolate chips or chopped chocolate in a double boiler over medium heat. As soon as the chocolate begins to melt, stir continuously until smooth.
- Use a pastry brush to brush the melted chocolate over the insides of the muffin liners, starting at the bottom of each one and moving outward and up against the sides. Make sure you cover all of the liners' grooves, checking from every angle including the top view. If you find any small spots that your brush can't fill, use a toothpick. Use all of the melted chocolate, making a thick first coat for each cup. Return the chocolate to the double boiler if needed during this process to remelt/reheat. Alternatively, keep the chocolate over the double boiler, removed from the stove, so it stays warm while you work. If the chocolate gets too cool, it will become gloppy and hard to use.
- Place the chocolate cups in the freezer for about 30 minutes, until firm. Meanwhile, prepare the ice cream mixture and chill.
- Once the first coating for the chocolate cups has set, melt another cup of chocolate chips or chopped chocolate in the double boiler. Coat the chocolate cups with a second layer of melted chocolate, being sure to cover the first coat entirely. Again, you can use a toothpick to fill in any small missed spots that the pastry brush can't get to. Return the chocolate cups to the freezer for about an hour, until solid. Meanwhile, make the chocolate cupcakes.
- While the cupcakes are cooling, remove the chocolate cups from the freezer and gently lift them out of the muffin tin. If the edges are stuck to the tin, run a toothpick along the outsides to loosen the cups. Once you can spin them around in the tin, you should be able to get them out. Carefully peel the muffin liners off of the cups. Be patient with this step, and if you get to a problem spot, start again at a different location. If the cups get too soft and feel like they're giving in to the pressure of your hands, place them back into the freezer for a bit and then continue.
- Place the chocolate cups in an airtight container and return to the freezer until ready to assemble the peanut butter cups.
Make the Peanut Butter Ice Cream
- If you don't already have your ice cream freezer bowl in the freezer, place it in now.
- Combine the peanut butter, sugar, half-n-half, vanilla, and salt in a blender and blend until smooth, pausing to wipe down the sides if needed.
- Chill mixture in the fridge thoroughly while you finish preparing the chocolate cups and make the chocolate cupcakes. For reference, you need to chill the mixture about 2 hours at least, until very cold.
- Once the other components of the peanut butter cups are ready, freeze the chilled ice cream mixture in your ice cream maker according to manufacturer's instructions.
- Assemble peanut butter cups immediately after ice cream is done churning/freezing, or place ice cream in the freezer for no more than one hour (to firm up slightly) before assembling.
- Store leftover ice cream in an airtight container in the freezer.
Make the Chocolate Cupcakes
- Preheat oven to 350 F and grease (not line) 6 cups in a standard size muffin tin.***
- Sift together the cocoa powder, all-purpose flour, baking powder, and salt in a bowl. Whisk lightly if needed to evenly combine.
- In the bowl of a stand mixer, cream together butter and sugar until light and fluffy. Add the egg and egg yolk one at a time, beating after each addition. Beat in vanilla.
- Add ½ of the dry ingredients to the wet, mixing in at lowest speed until somewhat incorporated but still streaked throughout the batter. Add the yogurt in the same way, until partially incorporated. Add the remaining dry ingredient mixture and mix until all ingredients are just combined with no streaks.
- Scoop the batter into the prepared muffin cups, gently leveling out the tops. Bake in the preheated oven for 20 minutes, or until a toothpick inserted into the center of a cupcakes comes out clean.
- Allow the cupcakes to cool for 5 minutes, and then place on a wire rack to cool completely. Cover with plastic wrap until ready to use. While the cupcakes are cooling, remove the paper liners from the chocolate cups.
- Once the cupcakes have cooled and while the ice cream is churning, slice the cupcakes into 3 sections. The ideas is to make two halves that will go into two separate peanut butter cups, with a thin middle section that can be set aside.**** Starting from the bottom of the cupcake, move the knife up to the height of half of a chocolate cup and make one slice here. Make the second slice at the bottom of the cupcake's dome. Grasp the dome as you make this second slice in order to get a clean cut. You should be able to fit each cupcake half narrow side (or dome side) down into a chocolate cup so that the top will line up with top of the chocolate cup once you fill the bottom half with ice cream. Click here for a diagram of how to slice the cupcakes.
Assemble the Peanut Butter Cups:
- Scoop ice cream into each peanut butter cup to fill halfway. Place a cupcake half on top, dome side or narrow side down. Put a bit of pressure on top to sink the cupcake in so the top is level with the top of the chocolate cup. If you added to much ice cream and it is coming up around the cupcake, you may need to remove some and try again. Place assembled peanut butter cups in an airtight container and freeze immediately, until the ice cream is solid. I recommend letting them freeze overnight.
- Melt chocolate for topping peanut butter cups in a double boiler as previously instructed over medium heat. Working with one cup at a time, spoon some melted chocolate onto the top. Use a spatula to push the chocolate gently toward the edges of the cup until all openings are completely sealed with chocolate. Use an icing spatula to lightly smooth the melted chocolate. Again, don't let the melted chocolate get cool and gloppy during this process. Place finished peanut butter cups in the freezer until ready to serve.
- Enjoy immediately upon serving.
Notes
*Being that the idea of Peanut Butter Cups is that they’re wrapped in a layer of solid chocolate, use a chocolate you really like.
**Since this recipe has quite a few steps, the Method of Preparation is there to guide you in regards to getting everything done in the most efficient amount of time. I would recommend starting this recipe the morning before the day you plan to serve the Peanut Butter Cups.
***If you're like me and only have one standard size muffin tin, remove the chocolate cups from the tin as previously instructed at this point and place on a tray to continue freezing. Make sure the chocolate on the cups isn’t too soft before trying to move them.
****I suggest eating the leftover middle slivers of cupcake with some of the extra peanut butter ice cream!
Chocolate Cups Adapted From: Jessie's Kitchen Chronicles
Peanut Butter Ice Cream Adapted From: Annie's Eats, Originally From: The Perfect Scoop by David Lebovitz
Chocolate Cupcakes Adapted From: Martha Stewart
As part of my participation in the 2012 Ice Cream Cupcake Contest, this recipe is also linked to Scoopalicious



Julia says
These are seriously amazing! I'm a total cake, pb, and ice cream girl, so all 3 in one little hand held nugget, yumyumyuuuum!
brighteyedbaker says
Exactly! It's like a package of yummy desserts all in one. :)
scoopalicious says
annnnnnnd, i know what i am making for my husband's birthday in april.
GORGEOUS presentation -- I love how they are packaged into such a neat and tidy cup.
Thanks for entering! Good luck!
Bethany@Scoopalicious
brighteyedbaker says
Haha, I hope you still remember come next April! And thanks. Crossing my fingers :)
Elizabeth says
That is brilliant. I love how well your cups turned out. Yum!
brighteyedbaker says
I was pretty excited with how they turned out too! Thanks :)
Steve C says
I have to say...they look so good. I need to add this recipe to my list. Thanks for posting.
brighteyedbaker says
Thank you!
It's always fun to hear when someone gets excited about a recipe I post.
Stef says
Beautiful! I LOVE how you tied everything up in a neat little package. It's the perfect ice cream version of peanut butter cups! Thanks so much for entering! Good luck!
brighteyedbaker says
Thanks! I kinda wanted something that would be all contained like that; makes it easier to eat and store for later. Thanks for hosting the contest; it was fun participating!
jasmina says
These are very cute I love the way they are like the ice cream version of a candy bar, like the frozen snickers!
brighteyedbaker says
Thanks :) That's exactly what I was going for.
Julie @White Lights on Wednesday says
These cupcakes are insane! I knew there would be stiff competition for the Ice Cream Cupcake Challenge, but wowzers!! All I can do right now is imagine the creamy smooth happy peanut butter chocolately taste bud-gasm I'm sure I'd be having if I had your cupcake. Totally pinning this for later. :)
brighteyedbaker says
HAHA thanks! I love your descriptive wording :) There were so many creative ideas for that contest. I think we all just get blown away seeing what others have done.
Kim Campbell says
These look amazing! Great job!!
brighteyedbaker says
Thank you so much! Your cupcakes are pretty amazing too!
what katie's baking says
I LOVE Reese's and these look so tempting. Especially with this hottt weather. Yumm!!
brighteyedbaker says
I love Reese's too! And yes, I'm all about the ice cream in the summer. :)
shaina says
This looks amazingly good! Can't wait to try these out, great job!
brighteyedbaker says
Well thanks!!
ATasteOfMadness says
Wow. This looks like a lot of work, but definitely worth it! I'm getting a peanut butter cup craving!
brighteyedbaker says
A lot of work, yes, but fun if you like spending time in the kitchen! Plus, you get to be proud of yourself in the end when you see what you've created. :)
Lynna says
GENIUS. SO TRYING THESE! ♥
brighteyedbaker says
Haha, thanks! Let it be your mission for the day. :)
TastefullyJulie says
OMG. I'm totally not talented enough to make these but I think I need someone to do it for me. Stat!
brighteyedbaker says
LOL! Good luck finding that someone :)
Heidi @ Food Doodles says
What a delicious idea! Awesome!
brighteyedbaker says
Thanks :) Gotta have some fun with ice cream!
sara says
Oh my gosh, wow! These are totally gorgeous and look absolutely delicious...peanut butter cups are probably my favorite candy, and I love the idea of turning them into a frozen dessert. Yum!
brighteyedbaker says
Thank you! I think we need all the frozen desserts we can get during the summer, don't you? :)