
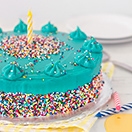
It's a good day when you have cake, and it's a better day when you have chocolate cake with rainbow sprinkles. Here's what's up:

Two layers of extra tender and moist, rich chocolate cake, surrounded by some sweet, slightly tangy, never-gets-old cream cheese frosting, with sprinkles galore all around. The sprinkle trick is one of the easiest ways to decorate a cake without needing a bunch of fancy frosting techniques or skills, and it's just FUN! Truth be told, I've been wanting to share this cake for a while, but since I'm not crazy about the pictures I've been putting it off. It is a pretty perfect birthday kinda cake though, and one worth sharing - great photos or not.
Print
Chocolate & Sprinkles Layer Cake
A supremely tender, moist, and chocolatey cake layered with sweet, slightly tangy cream cheese frosting and decorated with a heavy dose of sprinkles for color and a fun crunch.
- Cook Time: 40 minutes
- Total Time: 40 minutes
- Yield: one 9", 2-layer cake
Ingredients
Chocolate Cake
- butter and cocoa powder, for prepping pans
- 14 ounces (2 cups) granulated sugar
- 7 ⅜ ounces (1 ¾ cups, spoon and level) all-purpose flour, sifted
- 2 ⅝ ounces (¾ cup) good-quality cocoa powder, sifted
- 1 ½ teaspoons baking soda
- ¾ teaspoon salt
- 8 ½ ounces (1 cup) buttermilk
- 4 ounces (½ cup or 1 stick) unsalted butter, melted and slightly cooled
- 2 eggs
- 1 tablespoon vanilla extract
- 8 ounces (1 cup) hot coffee*
Cream Cheese Buttercream
- 8 ounces (1 cup or 2 sticks) unsalted butter, softened and cut into tablespoons
- 8 ounces cream cheese, softened
- 16 ounces (4 cups) confectioner's sugar, sifted
- 1 teaspoon vanilla extract
- pinch salt
- gel icing color (optional, I used Wilton's Teal Icing Color)
- sprinkles, for decorating (I used rainbow nonpareils
Instructions
Chocolate Cake
- Preheat oven to 350ºF. Prep two 9" cake pans by buttering the insides and lining the bottoms with parchment rounds. Dust the sides with cocoa and tap out any excess.
- In the bowl of a stand mixer, whisk together the sugar, flour, cocoa powder, baking soda, and salt. Add buttermilk, butter, eggs, and vanilla and mix in on medium-low speed for about 3 minutes, stopping halfway to scrape down bowl (including bottom) and beater; batter should be very smooth when done. Add coffee and fold in with a rubber spatula until evenly combined. Note that the batter will be very liquidy.
- Divide batter evenly between prepared pans and bake for 35-45 minutes, until a toothpick inserted into the center comes out clean or with just a few moist crumbs; cake edges should also be puling away from pan.
- Cool cakes in pans for 15 minutes, and then transfer to a wire rack, peel off parchment, and cool completely. Once cool, wrap cakes tightly in plastic wrap, transfer to a large zip-top bag, and freeze for 30 minutes before decorating.
Cream Cheese Buttercream
- In the bowl of a stand mixer fitted with the whip attachment, beat butter and cream cheese together on medium-high speed until smooth, wiping down bowl and beater as needed. With the mixer on low speed, gradually add the powdered sugar. Once completely incorporated, increase speed to medium-high again and beat until smooth and creamy, again wiping down bowl and beater as needed. Beat in vanilla extract and salt. Use a spatula to gradually mix in icing color (if desired).
Assembly
- Place one cake layer on a cardboard cake round or plate set on a rotating cake stand (you may want to place strips of parchment under the edges of the cake to keep the bottom clean**). Spread a layer of frosting on top, and then place the second cake layer over the first.
- Use an offset spatula to apply a thin layer of frosting to the cake over the top and sides to seal in the crumbs (this layer doesn't need to be perfect). Transfer the cake to the refrigerator for 30 minutes to allow the crumb coat to set.
- After chilling, apply a final, smooth layer of frosting all around the cake. Remove parchment strips, if you used them, and make sure bottom of decorating surface is completely clean before adding sprinkles.
- Place a large tray below cake to catch any loose sprinkles. Cup sprinkles in the palm of your hand and carefully press against sides of cake, starting at the bottom and working your way up as high as you want, until entire perimeter of cake is covered as desired. (When doing this, you don't actually want your hands to touch the cake, but rather just get close enough to let the sprinkles fall from your palm onto the sides of the cake.) When done, brush off any fallen sprinkles as best as possible, and then carefully tilt cake to let remaining sprinkles fall onto tray below.
- Transfer remaining frosting to a piping bag fitted with a large open star tip and pipe decoration around top of cake. Decorate with more sprinkles on top.
- Cake is best served at room temperature, but any leftovers should be stored in an airtight container in the refrigerator and brought back to room temperature before serving.
Notes
*Coffee simply helps intensify the chocolate flavors in the cake, but water can also be used as a substitute.
**To keep the bottom of your cake round or plate clean while frosting the cake: arrange four strips of parchment, each about 2" wide, in a square under the first layer of cake, with about 1" of parchment sticking out around the edges of the cake. Once you're done frosting the cake, gently pull out the parchment.
Chocolate Cake adapted from Ina Garten via Food Network
Cream Cheese Buttercream adapted from I Heart Baking
Casey Markee
Can't go wrong with Sprinkles, I'll have two slices please!
Alexandra robertson
This cake sounds perfect! I have been looking for a birthday cake recipe for my son and trying out some recipe. Love that yours has buttermilk and coffee!
alexandra
Thanks! It's definitely a perfect birthday cake with all the sprinkles! :)
Cat @ therusticwillow
Honestly, this cake just makes me happy looking at it. Those colors are gorgeous! I can't wait to try it for the next birthday to come about. Thank you so much for celebrating with me ! <3
alexandra
Haha thanks Cat! So happy I got to join in the fun!
Lexi @ Sempre Dolce
That cake looks so deliciously moist! :)
alexandra
YES! That it is. ;) Thanks Lexi!
Allison from Baking: a Love Story
I am LOVING this blog. And this is one of my favorite cakes so far. Totally making this one. Thanks!
xox,
A.
alexandra
Aww thank you so much!
June @ How to Philosophize with Cake
That cake looks gorgeous! can't go wrong with sprinkles :)