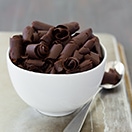
DIY Chocolate Curls
Use two simple ingredients to make your own chocolate curls for a fancy and impressive dessert garnish.
Ingredients
- 3 ounces good quality chocolate (bittersweet or semisweet), grated or finely chopped*
- 1 teaspoon coconut oil or vegetable shortening
Instructions
- Combine the chocolate and oil/shortening in a microwave-safe bowl and microwave for 30 seconds. Stir and microwave for another 30 seconds or so, until all of the chocolate has melted. Stir to smooth out.
- Pour the melted chocolate onto the back of a metal baking tray and use an offset spatula to spread out in a very thin layer in a rectangular shape. Make sure the chocolate layer is even and does not have any holes or gaps. Place in the freezer for 10-15 minutes to set before attempting to make curls. Meanwhile, line a plate or tray with parchment paper and set aside.
- To make curls, use a flat spatula with a thin, somewhat sharp edge (like the one pictured above) and hold at an angle with the front tip against one edge of the chocolate layer. Push away from you as the first strip of chocolate begins to lift up from the pan and curl, continuing until it is completely released from the pan. You can adjust the width of your curls depending on how much of the spatula you use for each strip. If the chocolate flakes when you try to curl it, it's too cold and needs to soften very briefly. If it doesn't curl and/or is melty, it's too soft and needs to be put back in the freezer for a minute or two longer.
- As you make the curls, use a toothpick to carefully transfer them to the parchment-lined plate/tray and place in the refrigerator. If they are quickly getting soft, leave them on the metal baking tray and place them back in the freezer for a few minutes to set before transferring to the refrigerator. Continue until all chocolate has been curled, returning tray to the freezer to cool down the remaining chocolate as needed during the process.
- Once curls have set in the refrigerator, transfer to an airtight container (where they won't get smashed) and keep refrigerated until ready to use.
Notes
*I grated my chocolate with a Microplane zester/grater .
Be aware that, particularly in the summer months, the chocolate will melt quickly. Aim to work fast and don't hesitate to chill the chocolate in the freezer as needed before continuing.
Variations: You can experiment with the look of your chocolate curls by using different spatulas or similar utensils to create the curls, and also by holding the utensil at different angles while curling. You can also make curls that are more spread out, rather than tightly coiled, by aiming to the left or right as you make each curl, rather than working in a straight line.
Find it online: https://www.brighteyedbaker.com/diy-chocolate-curls/
