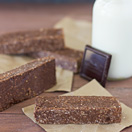
Healthy Dark Chocolate No-Bake Bars
These no-bake bars are loaded with nutritious ingredients but taste sinfully rich, chocolate-y and delicious! They're so easy to make and perfect for an on-the-go snack.
- Yield: 16 bars 1x
Ingredients
Scale
- 6 ounces (1 7/8 cups) old-fashioned rolled oats
- 4 ounces (1 cup) pecans
- 3 1/2 ounces (1 cup) slivered almonds
- 5 1/2 ounces (1 cup, halved and packed in) pitted medjool dates
- 1/2 teaspoon salt
- 8 ounces (1 1/3 cup) dark chocolate baking chips (or chocolate bar, chopped; for dairy-free and sugar-free, I recommend Lily’s Sweets baking bar)
- 1 1/2 teaspoons pure vanilla extract
Instructions
- Preheat oven to 350ºF. Line two baking sheets with parchment paper and divide the oats, pecans, and almonds between the two sheets, spreading out in flat layers. Bake in the preheated oven for 10-15 minutes to toast, switching and rotating sheets halfway through the baking time, until nuts and oats smell fragrant. Lift the parchment off of the baking sheets and use to transfer the nuts and oats to a food processor fitted with the steel blade attachment. Allow to cool 20 minutes.
- Add the dates to the food processor and sprinkle over the salt. Process the mixture until it resembles coarse sand. Add 6 ounces (1 cup) chocolate chips and process in partway. Add the remaining 2 ounces and continue to process until the mixture has turned evenly brown from the melting chocolate. You may need to stop and use a spatula to push the mixture around (basically helping the machine out) periodically. Add the vanilla extract and pulse in.
- Transfer the mixture to a parchment or foil-lined 8" square pan. Press in to fill the entire pan and use a wide spatula to flatten the top. Place in the refrigerator to cool until firm, about 30-60 minutes. Use the parchment or foil to lift the bars out of the pan, and then slice into bars with a serrated knife.
- Store bars in an airtight container in the refrigerator. Bring to room temperature before eating (my preference!)*
Notes
*You can also wrap each bar in plastic wrap so that it's all ready as a grab-and-go snack. Since these are even more awesome at room temperature, it works out perfectly; they'll come to room temp. by the time you're ready to snack!
