Gluten-Free Pumpkin Scones with Maple Glaze
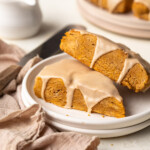
These gluten-free pumpkin scones make the best breakfast for crisp fall mornings with their soft, tender crumb, warm fall spices, and sweet maple glaze. If Starbucks pumpkin scones have been your go-to in years past, these are a must-try!
- Prep Time: 25 minutes
- Chill Time: 1 hour
- Cook Time: 15 minutes
- Total Time: 1 hr 40 minutes
- Yield: 8 scones 1x
- Category: biscuits and scones
- Method: baking
- Cuisine: American
- Diet: Gluten Free
Ingredients
Scale
Gluten-Free Pumpkin Scones
- 3 cups (360 grams) gluten-free all-purpose flour
- 1/2 cup, packed (106 grams) brown sugar
- 1 1/2 tablespoons baking powder
- 2 teaspoons cinnamon
- 1/2 teaspoon salt
- 1/2 teaspoon ground ginger
- 1/2 teaspoon ground cloves
- 1/4 teaspoon ground allspice
- 1/4 teaspoon ground nutmeg
- 8 tablespoons (113 grams) cold unsalted butter, cut into cubes
- 1 cup (227 grams) pumpkin puree
- 1/2 (117 grams) heavy cream
- 1 1/2 teaspoons vanilla extract
Maple Glaze
- 1/2 tablespoon (7 grams) unsalted butter
- 1/4 cup (78 grams) pure maple syrup
- 1/4 teaspoon vanilla extract
- 1 1/4 cups (142 grams) confectioner’s sugar, sifted
- 1/4 teaspoon ground cinnamon
- pinch of salt
- 1 tablespoon heavy cream
Instructions
Gluten-Free Pumpkin Scones
- In a large bowl, whisk together the flour, brown sugar, baking powder, cinnamon, salt, ginger, cloves, allspice, and nutmeg.
- Add the cubed butter and cut in with a pastry cutter until the butter is dispersed and only pea-sized chunks remain. You can also use your fingertips to rub the butter into the flour.
- In a separate bowl, whisk together the pumpkin puree, cream, and vanilla extract. Add to flour mixture and fold in until the dough starts to come together; it will still be crumbly at this point.
- Use your hands to finish bringing the dough together into a ball, adding more cream sparingly if it seems too dry. The dough should be soft but not sticky. Transfer to a parchment-lined baking sheet and press into a round disk about 1” thick. Place in the freezer to chill for 1 hour.
- Towards the end of the chilling time, preheat your oven to 400ºF with a rack in the center position. Remove the chilled scones from the freezer and slice into 8 equal pieces (like you would a pizza). Space the scones apart on the baking sheet.
- Bakes in preheated oven for 15-20 minutes, until scones are puffy and tops no longer appear glossy or wet. A toothpick inserted into the center of one should come out clean. Cool on pan over a wire rack for about 15 minutes. Then, transfer scones directly to the cooling rack and let cool to room temperature before glazing.
Glaze
- Melt the butter in a small microwave-safe bowl. Whisk in the maple syrup and vanilla extract.
- Add confectioner’s sugar, cinnamon, and salt. Whisk until smooth. Add the cream, mixing in just enough for the glaze to drizzle slowly down from the whisk when lifted.
- Spoon glaze over cooled scones, spreading it over the tops and letting it drip down the sides. Let set before serving.
Notes
Ingredient Notes:
- Make sure that your gluten-free flour blend contains a binding agent like xanthan gum or guar gum. Regular all-purpose flour can also be used if preferred.
- The individual spices in the scone dough can be replaced with 1 tablespoon of pumpkin pie spice.
- If using salted butter, reduce the salt in the scones by 1/4 teaspoon. Omit the added salt in the maple glaze.
Storing and Serving:
- Scones are best served the day they are baked, but leftovers can be stored in an airtight container or zip-top bag in the refrigerator for up to 5 days.
- Reheat in the microwave (about 30 seconds) before serving.
Freezing Scone Dough:
- If you want to freeze the scone dough for a longer period before baking, you can! Freeze for 1 hour as directed in step 4, and then slice into triangles as described in step 5. Place in an airtight zip-top bag and freeze for up to 3 months.
- When ready to bake, remove scones from the freezer and transfer to a parchment-lined baking sheet. Allow to thaw slightly while preheating your oven. Baking time may need to be increased by 5 minutes.
Find it online: https://www.brighteyedbaker.com/pumpkin-scones-gluten-free/